V
Viktor Vogel
Guest
In my last article about Varnish in a Docker container, I’ve explained how to easily activate server-side caching and what advantages you can get with this mechanism. Today, I will show you how you can reduce server load and drastically improve your WordPress website speed with Memcached.
Memcached – a distributed memory caching system
Memcached caches data and objects directly into the memory (RAM) and reduces the amount of times an external source has to be read (e.g. the database or API-calls). This especially helps dynamic systems like WordPress or Joomla! by noticeably improving the processing time!
Installing Memcached
On my server, I run Plesk Onyx with CentOS 7.x. This tutorial also applies to other systems, just remember to use the system-specific commands (e.g. apt-get instead of yum). To install Memcached, first access your server via SSH and use the command line:
yum install memcached
After the installation process, we start it with:
service memcached start
Next we have to install PECL Memcached for the corresponding PHP version. WordPress is fully compatible with PHP 7, so let’s activate Memcached for the latest PHP 7.1 version. Start by installing all the necessary packages to add our custom PHP module in Plesk.
yum install make plesk-php71-devel gcc glibc-devel libmemcached-devel zlib-devel
Build the module with these instructions. You don’t have to specify the libmemcached directory manually, simply hit Enter if prompted.
/opt/plesk/php/7.1/bin/pecl install memcached
In the next step, we have to add a line to the corresponding configuration file to register the module in PHP. You can use the command line without having to open the ini file with an editor.
echo "extension=memcached.so" > /opt/plesk/php/7.1/etc/php.d/memcached.ini
And finally, re-read the PHP handlers so that you see the module in the PHP overview in the Plesk GUI.
plesk bin php_handler --reread
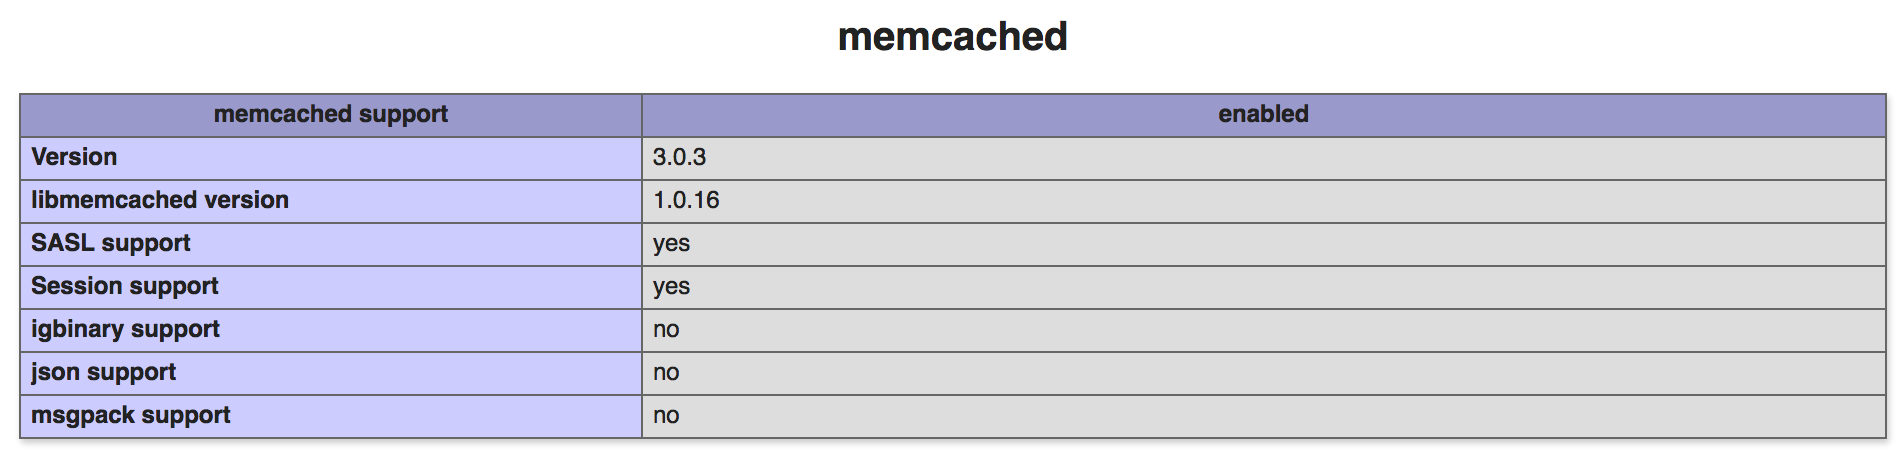
You can check the phpinfo()-page now to find out if the memcached module was loaded properly.
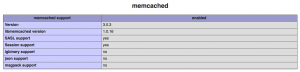
Memcached – phpinfo() output
Or directly via the command line:
/opt/plesk/php/7.1/bin/php -i | grep "memcached support"

Memcached – PHP command line check
Activate Memcached in WordPress
Once Memcached is installed on the server, it is easy to activate it in WordPress. First, we need to activate the Memcached backend with a special script that auto-detects whether to use Memcached as the caching mechanism.
Download the script from https://github.com/bonny/memcachy and move all files to the /wp-content/ folder.
If you didn’t change the default port (11211) of Memcached, then you are ready to use it directly. If you’ve changed it, then you will have to add the following code to the wp-config.php (placed in the root of your WordPress instance).
$memcached_servers = array( array( '127.0.0.1', 11211 ) );
Okay, once the backend is activated, we will install a cache plugin to store and serve rendered pages via Memcached. Install the plugin Batcache (https://wordpress.org/plugins/batcache/) using the installation instruction.
That’s pretty much it! You can open the advanced-cache.php file and adjust the settings for your needs. The file batcache.php is a small plugin that regenerates the cache on posts and pages. Don’t forget to activate the plugin in the backend on the plugin page!
Verify that Memcached works properly in WordPress
Now, let’s verify that you did everything correctly. The easiest way to see whether the rendered page was sent from cache is to add an additional header field to the response.
To achieve it, you have to modify the advanced-cache.php file. Open the file and search for
var $headers = array();
Change this line to
var $headers = array('memcached' => 'activated');
Open the Developer Tools in your browser, select the Network tab and reload your website several times (just to be sure the page is loaded from the cache) and check the response headers. If you see the memcached header field, then everything is fine!
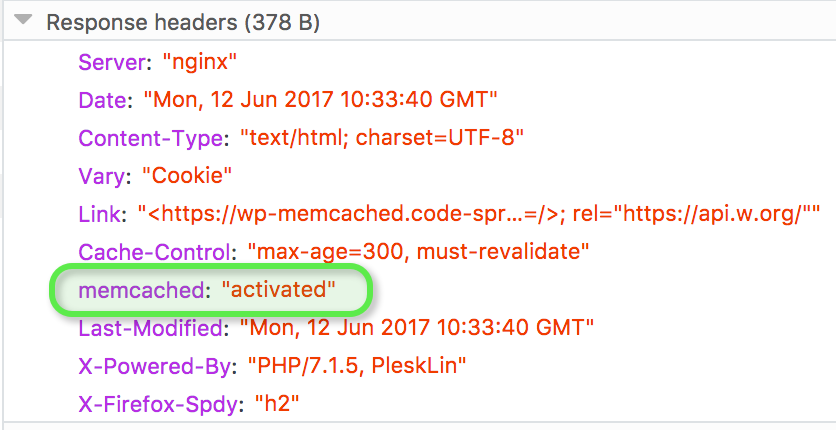
Memcached – Response Headers Check
Let’s do some stress tests with Blitz.io!
We can test the load performance by stress testing, which will load the website with many concurrent users per second for a certain time span. Without any security and overload protection, your server should start to respond slower until the requests cannot be handled anymore. With Memcached activated, your server should be able to serve intensive requests longer without throwing errors.
Let’s run some load and performance tests with Blitz.io.
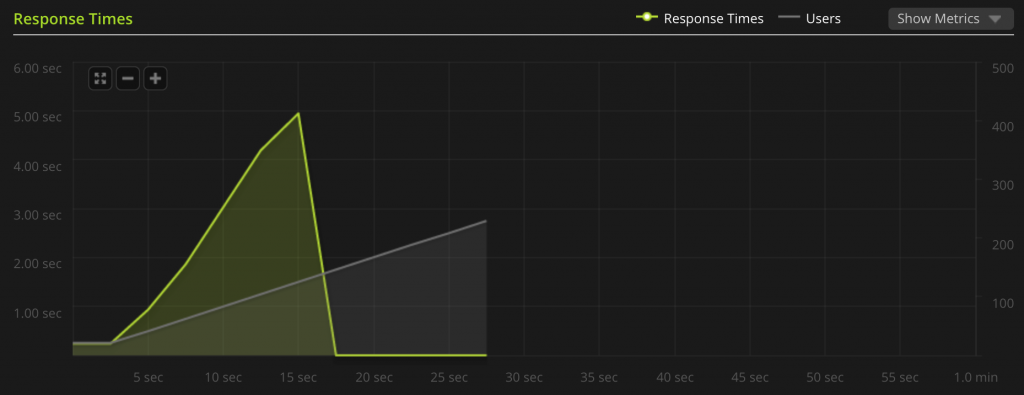
Note: For this stress test I took the same small server that I used for the tests with Varnish (only 1 CPU and 500MB Memory)!
Result WITHOUT Memcached:
Stress test – WordPress without Memcached
It is the same result like in the Varnish stress test. As you can see, I had to abort the stress test because the server couldn’t handle the requests less than 5 seconds and less than 50 concurrent users into the test. After just 15 seconds, the server collapsed completely and no requests could be managed anymore!
Result WITH Memcached:

Stress test – WordPress with Memcached
As you can see, the Memcached cache allows us to keep the server stable even under heavy load. The small test server handled over 400 concurrent users and responded all requests over 50 seconds without any errors. After 50 seconds and almost 450 concurrent users, the server finally overloaded and stopped accepting further requests. With a more powerful server, the numbers would be much higher.
Therefore, it’s a great idea to use Memcached to keep your website reactive, even when it suffers a simple attack. For real DDoS attacks (Distributed Denial of Service attack) you’d be better off with CloudFlare ServerShield to protect your server.
Summary: WordPress with Memcached works perfectly
Memcached can greatly improve the performance of your WordPress website and reduce the CPU-load of your server. It’s easy to set up a working environment and it works out-of-the-box.
Thank you for reading my article, let me know your comments!
Have fun improving the speed of your WordPress website and stay Plesky!
The post How to reduce server load and improve WordPress speed with Memcached appeared first on Plesk.
Continue reading...
Memcached – a distributed memory caching system
Memcached caches data and objects directly into the memory (RAM) and reduces the amount of times an external source has to be read (e.g. the database or API-calls). This especially helps dynamic systems like WordPress or Joomla! by noticeably improving the processing time!
Installing Memcached
On my server, I run Plesk Onyx with CentOS 7.x. This tutorial also applies to other systems, just remember to use the system-specific commands (e.g. apt-get instead of yum). To install Memcached, first access your server via SSH and use the command line:
yum install memcached
After the installation process, we start it with:
service memcached start
Next we have to install PECL Memcached for the corresponding PHP version. WordPress is fully compatible with PHP 7, so let’s activate Memcached for the latest PHP 7.1 version. Start by installing all the necessary packages to add our custom PHP module in Plesk.
yum install make plesk-php71-devel gcc glibc-devel libmemcached-devel zlib-devel
Build the module with these instructions. You don’t have to specify the libmemcached directory manually, simply hit Enter if prompted.
/opt/plesk/php/7.1/bin/pecl install memcached
In the next step, we have to add a line to the corresponding configuration file to register the module in PHP. You can use the command line without having to open the ini file with an editor.
echo "extension=memcached.so" > /opt/plesk/php/7.1/etc/php.d/memcached.ini
And finally, re-read the PHP handlers so that you see the module in the PHP overview in the Plesk GUI.
plesk bin php_handler --reread
You can check the phpinfo()-page now to find out if the memcached module was loaded properly.
Memcached – phpinfo() output
Or directly via the command line:
/opt/plesk/php/7.1/bin/php -i | grep "memcached support"

Memcached – PHP command line check
Activate Memcached in WordPress
Once Memcached is installed on the server, it is easy to activate it in WordPress. First, we need to activate the Memcached backend with a special script that auto-detects whether to use Memcached as the caching mechanism.
Download the script from https://github.com/bonny/memcachy and move all files to the /wp-content/ folder.
If you didn’t change the default port (11211) of Memcached, then you are ready to use it directly. If you’ve changed it, then you will have to add the following code to the wp-config.php (placed in the root of your WordPress instance).
$memcached_servers = array( array( '127.0.0.1', 11211 ) );
Okay, once the backend is activated, we will install a cache plugin to store and serve rendered pages via Memcached. Install the plugin Batcache (https://wordpress.org/plugins/batcache/) using the installation instruction.
- Download and unzip the package
- Upload the files advanced-cache.php to the /wp-content/ folder
- Open wp-config.php and add the following line
define('WP_CACHE', true);- Important: Be sure that Memcached is enabled properly for the selected PHP version before adding this line else an error will be thrown!
- Upload the file batcache.php to the /wp-content/plugins/ folder
That’s pretty much it! You can open the advanced-cache.php file and adjust the settings for your needs. The file batcache.php is a small plugin that regenerates the cache on posts and pages. Don’t forget to activate the plugin in the backend on the plugin page!
Verify that Memcached works properly in WordPress
Now, let’s verify that you did everything correctly. The easiest way to see whether the rendered page was sent from cache is to add an additional header field to the response.
To achieve it, you have to modify the advanced-cache.php file. Open the file and search for
var $headers = array();
Change this line to
var $headers = array('memcached' => 'activated');
Open the Developer Tools in your browser, select the Network tab and reload your website several times (just to be sure the page is loaded from the cache) and check the response headers. If you see the memcached header field, then everything is fine!
Memcached – Response Headers Check
Let’s do some stress tests with Blitz.io!
We can test the load performance by stress testing, which will load the website with many concurrent users per second for a certain time span. Without any security and overload protection, your server should start to respond slower until the requests cannot be handled anymore. With Memcached activated, your server should be able to serve intensive requests longer without throwing errors.
Let’s run some load and performance tests with Blitz.io.
Note: For this stress test I took the same small server that I used for the tests with Varnish (only 1 CPU and 500MB Memory)!
Result WITHOUT Memcached:

Stress test – WordPress without Memcached
It is the same result like in the Varnish stress test. As you can see, I had to abort the stress test because the server couldn’t handle the requests less than 5 seconds and less than 50 concurrent users into the test. After just 15 seconds, the server collapsed completely and no requests could be managed anymore!
Result WITH Memcached:
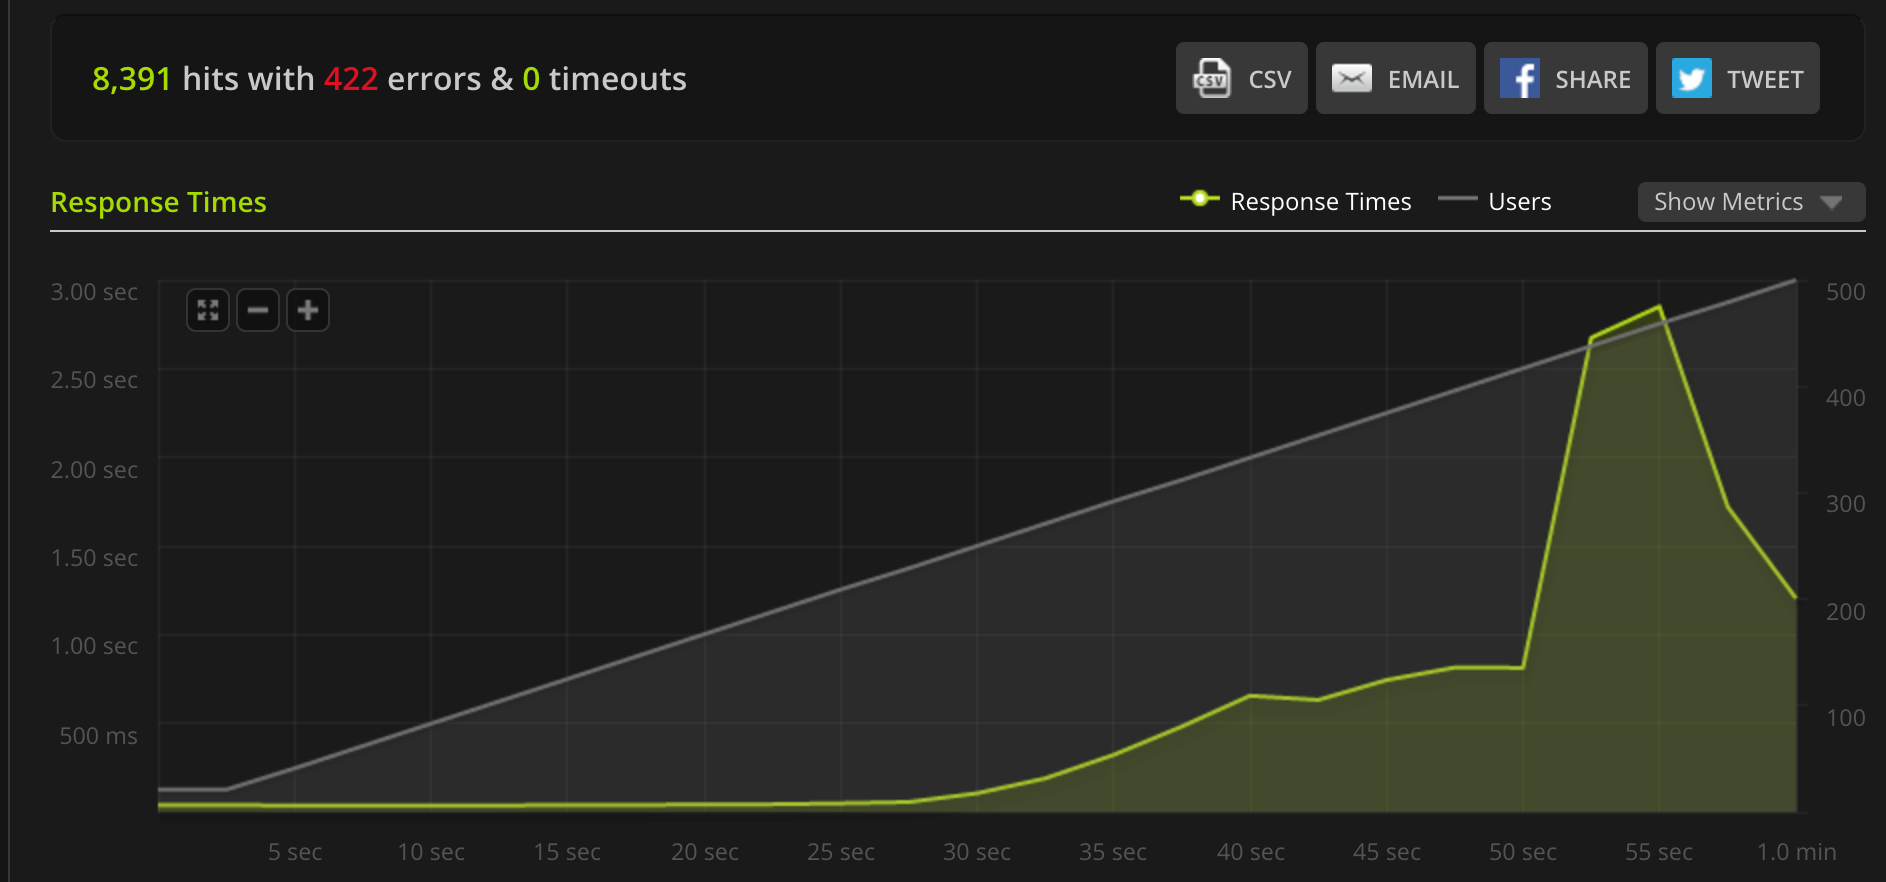
Stress test – WordPress with Memcached
As you can see, the Memcached cache allows us to keep the server stable even under heavy load. The small test server handled over 400 concurrent users and responded all requests over 50 seconds without any errors. After 50 seconds and almost 450 concurrent users, the server finally overloaded and stopped accepting further requests. With a more powerful server, the numbers would be much higher.
Therefore, it’s a great idea to use Memcached to keep your website reactive, even when it suffers a simple attack. For real DDoS attacks (Distributed Denial of Service attack) you’d be better off with CloudFlare ServerShield to protect your server.
Summary: WordPress with Memcached works perfectly
Memcached can greatly improve the performance of your WordPress website and reduce the CPU-load of your server. It’s easy to set up a working environment and it works out-of-the-box.
Thank you for reading my article, let me know your comments!
Have fun improving the speed of your WordPress website and stay Plesky!
The post How to reduce server load and improve WordPress speed with Memcached appeared first on Plesk.
Continue reading...
