J
Joerg Strotmann
Guest
When it comes to e-commerce, picking the right platform to power your store is a difficult choice. As a startup, you’ll want to run your e-commerce business off on a firm footing. This means going fast and secure, minimizing unnecessary expenditure and taking advantage of valuable opportunities.
WooCommerce is by far the most popular and rapidly developing plugin that provides e-commerce functionality for WordPress sites. Since its birth in 2011, it has become one of the most widely used tools to power online stores. After being acquired by Automattic, the company that brought us WordPress.com, you can rest assured you’re in good company.
If you haven’t used WooCommerce before, you should start with my first tutorial on how to install WordPress and WooCommerce plugins and themes, and how to keep them secure and up to date – with minimum effort.
This second tutorial for WooCommerce covers the various settings and options to successfully set up your online store!
Here’s what we’ll cover:
Before adding products to your e-commerce site, let’s set up your store first. To your store settings, go to WooCommerce -> Settings. The settings page is divided into several tabs, don’t forget to click the ‘Save Changes’ button after making changes.
General options
Here you will find the general settings for your online store.
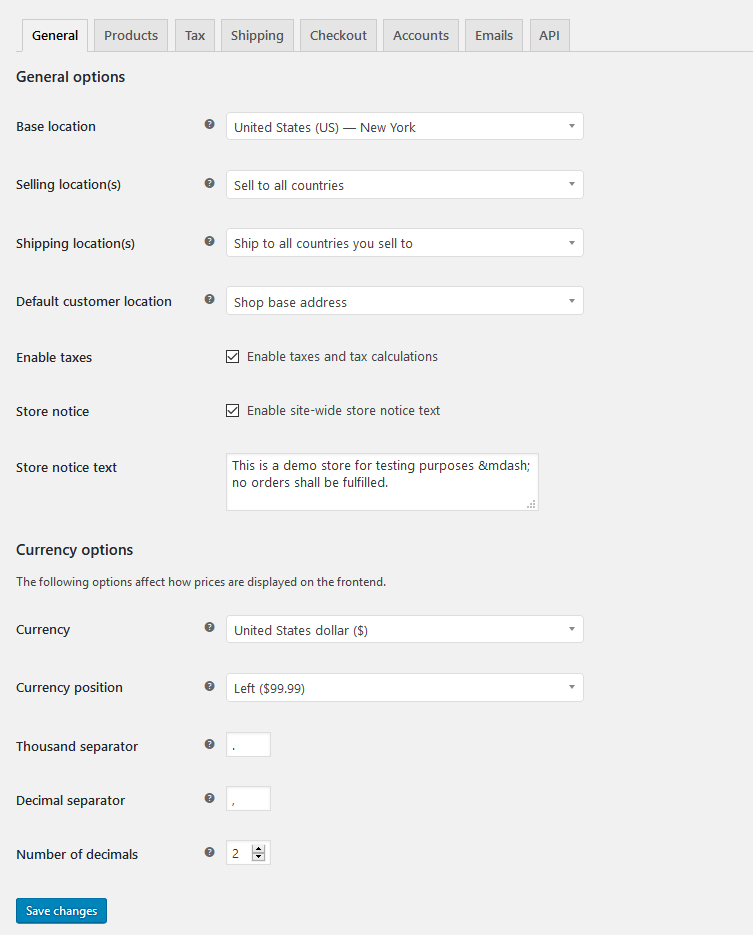
Image: WooCommerce – General Settings
In this section, you can define your shop’s base country and state (i.e., Where you are based as a seller). It determines default tax rates and customer locations. Choose to sell to all countries or to specific countries, and which countries you will ship to. Do not forget to enable or disable taxes on your store. Unchecking ‘Enable taxes’ will hide the settings for taxes.
Plesk tip: You can also enable a site-wide notice from this section. To do that, check the ‘Store Notice’ box and enter the message in the box.
Currency options
In this section, you can define all the currency-related options, including the default currency, currency position, thousand and decimal separator, the number of decimals, etc.
Define product settings
This tab lets you define the settings options for your products.
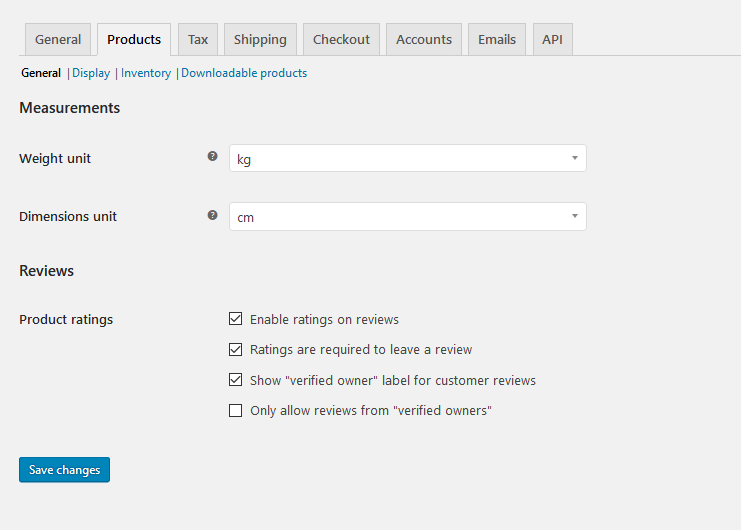
Image: WooCommerce – Product Settings
This section has two types of options. ‘Measurements’ lets you enter weight and dimensions units for products, and ‘Reviews’ lets you enable/disable ratings on product reviews.
Display
This section lets you define the shop page, what to display on that page, default product sorting and add-to-cart behavior. You can provide custom dimensions for catalog images, single product images, product thumbnails, and product images galleries.
Inventory
This section consists of the options related to inventory management
Plesk tip: Enable this feature by checking the ‘Enable stock management‘ box. Then, you can define when to send low stock and out of stock notifications to a particular recipient.
Downloadable products
If you are offering digital products, this section controls how your store provides downloadable files to purchasers. It is also possible to require users to be logged in and to allow your product to be downloaded only after the order is processed.
Taxonomies
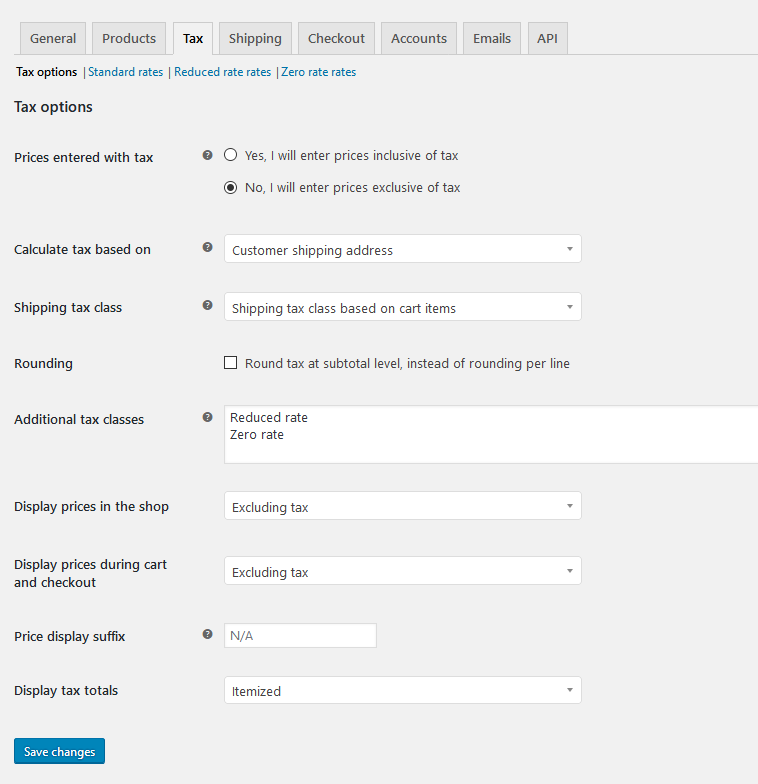
Image: WooCommerce – Taxonomies
Setting up taxes and tax rates is one of the first tasks you want to perform when setting up a store. Taxes can be a complex matter, but WooCommerce aims to make setup as straightforward as possible. More at: WooCommerce Tax Settings.
Plesk tip: We recommend consulting with a tax professional or an accountant on what may be your best options, plus any applicable laws to your state, country or business. Each business is unique, and there’s no way we can cover the millions of possibilities.
Shipping options
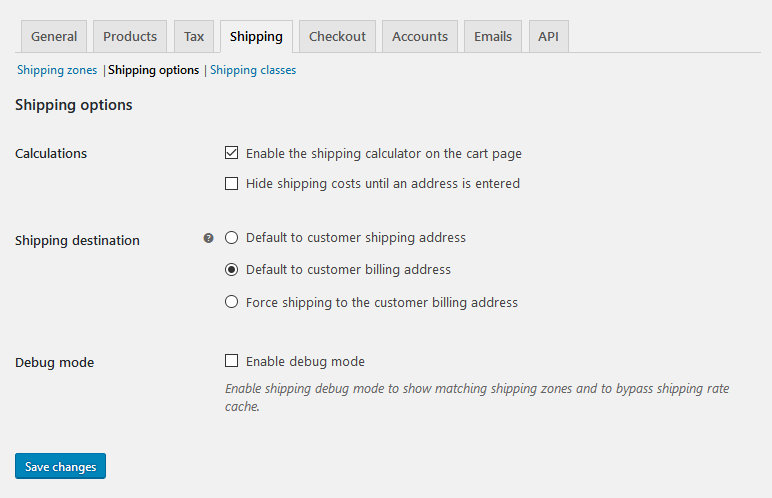
Image: WooCommerce – Shipping
The main shipping settings screen is for ‘Shipping Zones’. Think of a shipping zone as a geographic region where a certain set of shipping methods and their rates apply. WooCommerce will match a customer to a single zone using their shipping address and present the shipping methods within that zone to them.
Below, you will find available ‘Shipping methods’. Like payment gateways, you can rearrange them via drag & drop and choose a default method. You can customize the shipping method options from the top section.
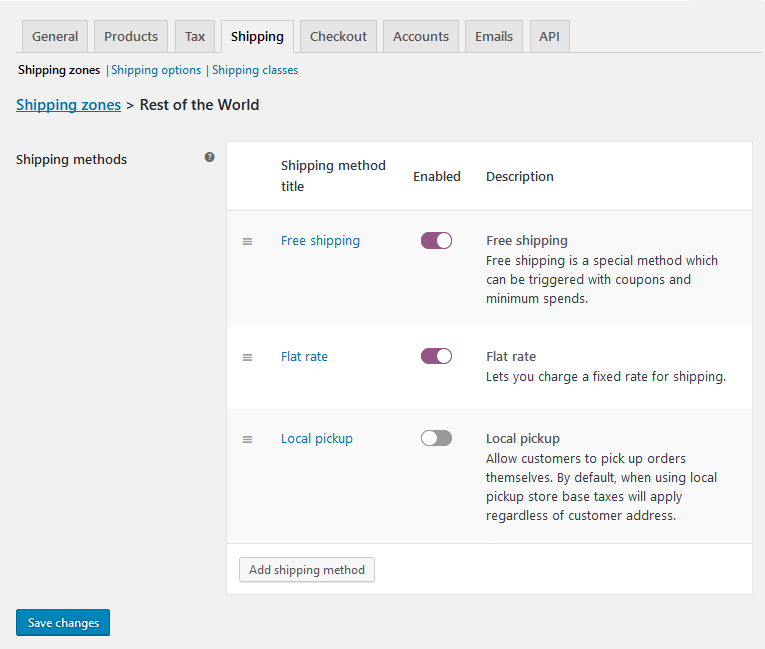
Image: WooCommerce – Shipping Zones
‘Shipping classes’ can be used to group products of similar types and that use the same shipping methods, such as Flat Rate Shipping. For example, with shipping classes and Flat Rate Shipping, you can create different flat rates for different product types, like bulky items and small items.
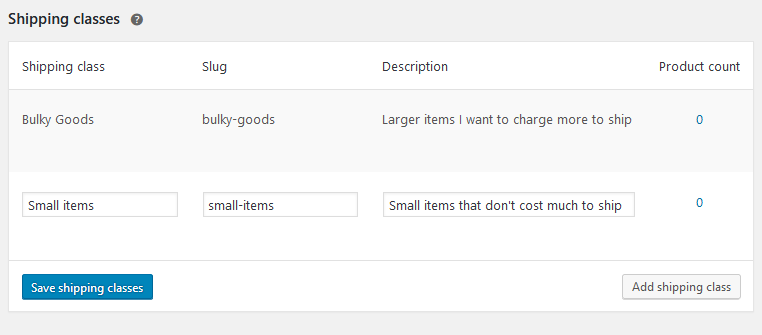
Image: WooCommerce – Shipping Classes
Plesk tip: Shipping classes are used to group products – they are not used to offer shipping rates to customers. To set up shipping rates, configure Shipping Zones, and then add your shipping class costs to a shipping method, a Flat Rate for example.
Checkout options
Under the Checkout sub navigation section, there are several options for the general checkout process of your store.
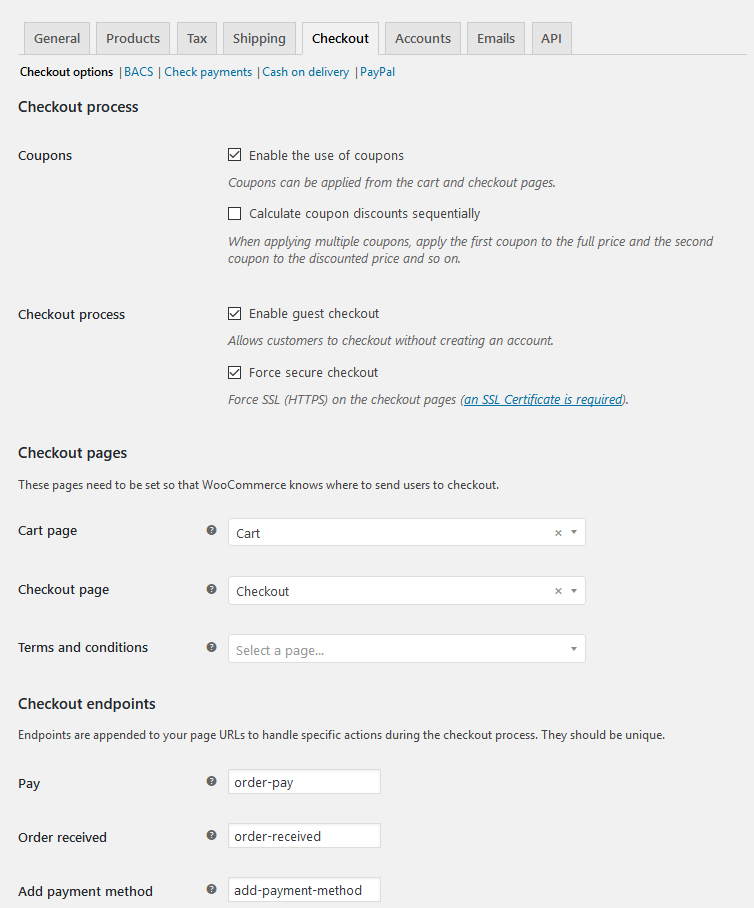
Image: WooCommerce – Checkout options
If you want to provide coupons or allow guest checkout, you can do so by checking the respective boxes.
Plesk tip: When using a SSL certificate (strongly recommended) for your online shop, make sure HTTPS is being used on the checkout page by checking the ‘Force Secure Checkout’ page.
Checkout pages
Pages need to be set so WooCommerce knows where to send users to check out: Cart Page, Checkout Page, or Terms and Conditions. You need not use a default WooCommerce page, but you must have a page set up for the Cart and Checkout pages. Otherwise, your customers cannot buy and pay.
Checkout endpoints
Endpoints are appended to page URLs to handle specific actions during the checkout process. They should be unique. Learn more about WooCommerce endpoints.
Payment Gateways
Installed gateways are listed and can be dragged and dropped to control the order in which they appear to customers.
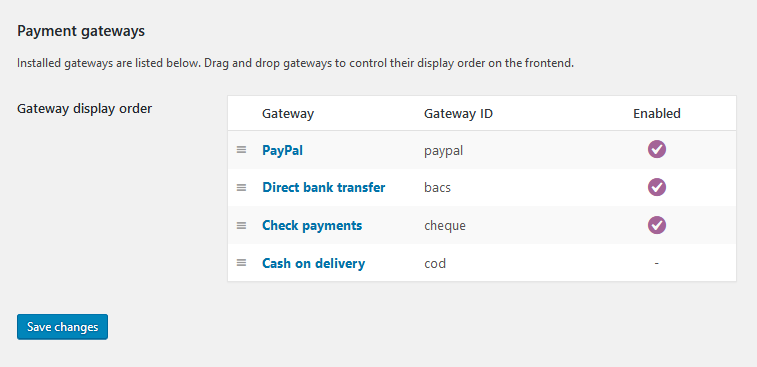
Image: WooCommerce – Payment Gateways
Plesk tip: The free version comes with five payment gateways as listed below. You can add more by purchasing WooCommerce add-ons.
Free Payment Gateways included in WooCommerce:
‘Pages’ need to be set so WooCommerce knows where to send users to access account-related functionality.
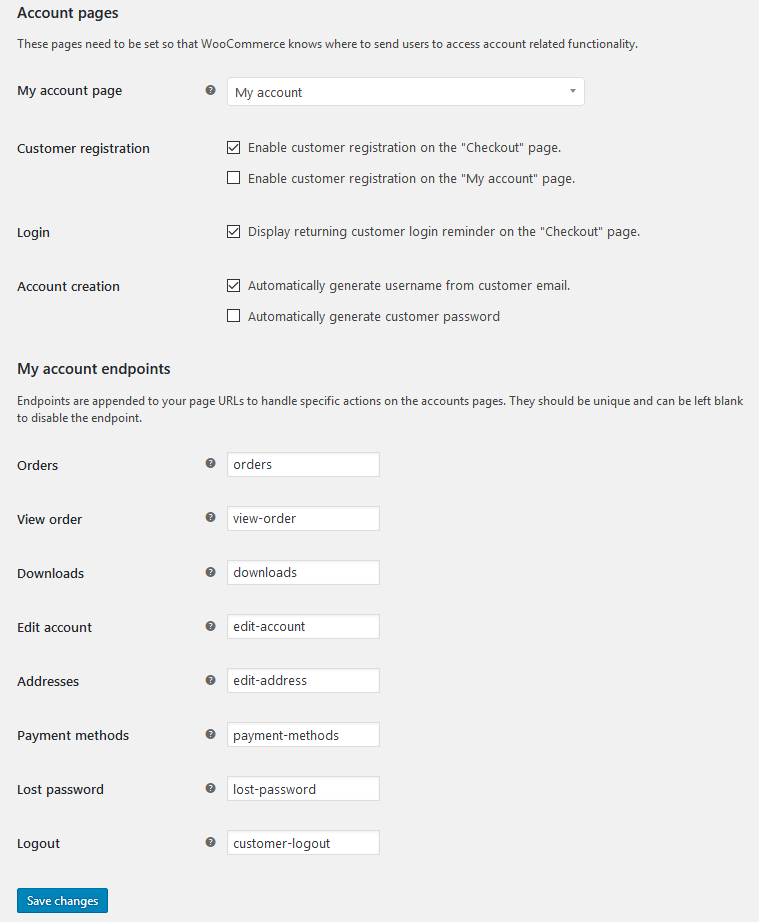
Image: WooCommerce – Account settings
My account page
Choose a page from the dropdown that you want to use for the ‘My Account page’.
My account endpoints
Endpoints are appended to your page URLs to handle specific actions on the accounts pages. They should be unique.
In the ‘Enable Registration‘ section, you can allow the users to register on the checkout and my account pages. You can choose to auto-generate the username and password in the ‘Account Creation’ section.
Emails
From this section, you can customize various email options for your e-commerce site.
Email sender options
Set the ‘From’ name and email address for the sender used in WooCommerce emails.
Email template
This section lets you customize WooCommerce emails. You can provide a header image, add footer text and choose custom colors for the base, background, email body text, and background.
API settings
Choose to enable the ‘REST API’ to access store data from outside WordPress, e.g., our iOS app or other external apps.

Image: WooCommerce – REST API
Generate API Keys
The WooCommerce REST API works on a key system to control access. These keys are linked to WordPress users on your website. To create or manage keys for a specific WordPress user, go to Keys/Apps.
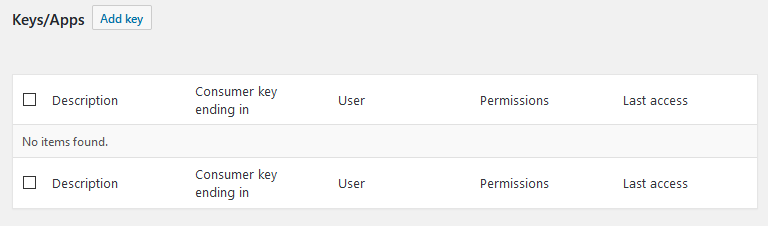
Image: WooCommerce – API Keys
To get started, select -> Add Key.
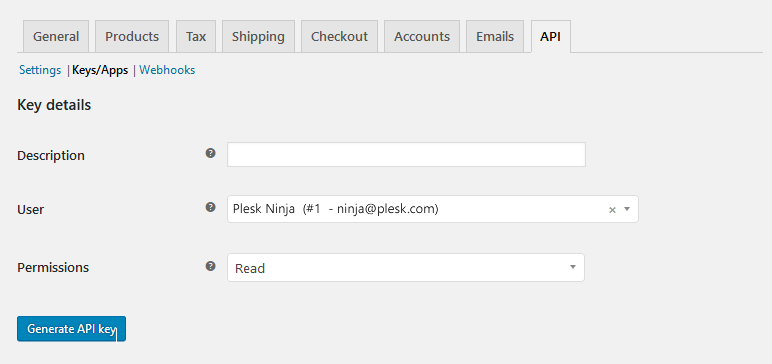
Image: WooCommerce – API Keys
Select the User you would like to generate a key for in the User field and add a Description. Choose the level of access for this API key, which can be Read access, Write access or Read/Write access. Then select the ‘Generate API Key’ button and WooCommerce will generate API keys for that user.
Now that keys have been generated, you should see two new keys, a QRCode, and a Revoke API Key button. These two keys are your Consumer Key and Consumer Secret.
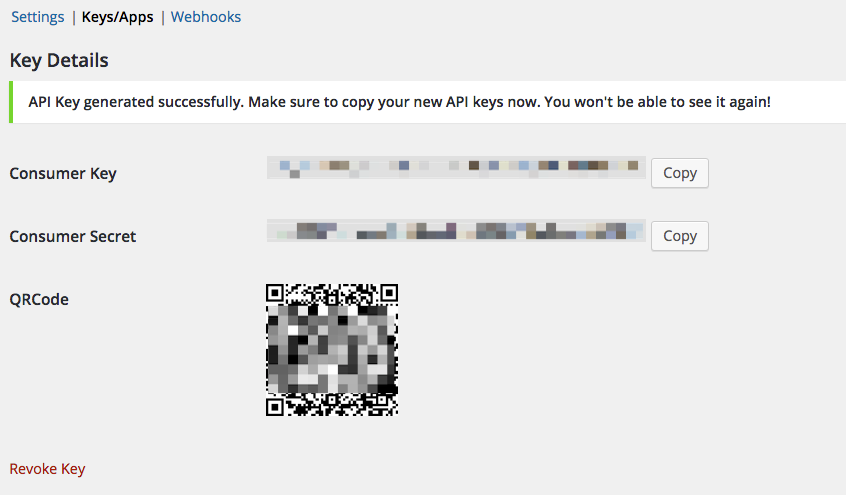
Image: WooCommerce – Key Details
Place your consumer key and consumer secret in the application that uses the WooCommerce API (the application should request your URL as well).
Plesk tip: If you would like to learn more about REST API, check Gerhard’s (WooCommerce Engineer at Automattic) informative blog post, WooCommerce REST API Client Library.
Developer documentation
You can find the REST API documentation at: WooCommerce REST API Docs.
Libraries
Plesk tip: With Plesk you get a ready-to-code environment. Use PHP, JavaScript, Ruby, Python, Java, .Net, node.js, html5 and much more on the fly!
Managing products
There are various kinds of products that you can add to your online store. In this section, you will learn the basics of adding a product and how to define the different types of products you add to your store.
You will also learn about adding descriptions and prices, as well as other options you may have while adding products to your store. Now, let’s see how to add products to your website.
First, let’s add products to your website.
Go to Products -> Add Product. You will be taken to a page like this.
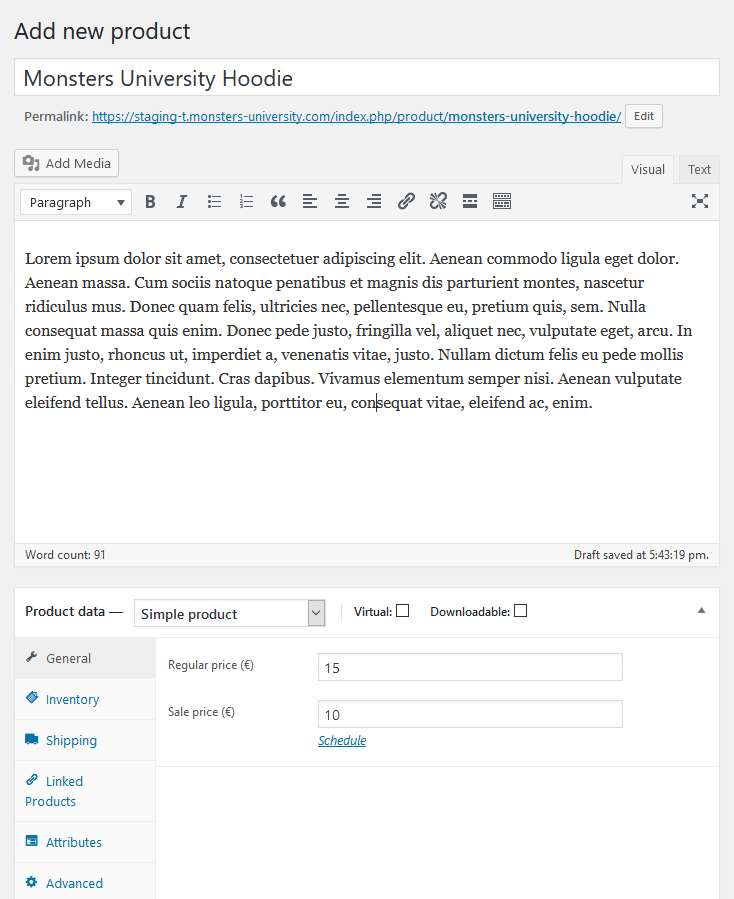
Image: WooCommerce – Products
While the upper portion of the page looks almost like the new post editor, you will find product related options in the lower part. Provide the product name and a short product description. Then, move to the ‘Product Data‘ section below.
Product data – Type of products
First of all, choose the product type. The configurable options will vary depending on the product type:
Note: Some extensions if installed will add more product date choices. For example, WooCommerce Subscriptions adds new product types as does WooCommerce Memberships.
General
In the first tab ‘General’, choose a regular price and the sale price of the product. If it is a downloadable product, you need to add the downloadable files and set the download limit and the download expiry date.
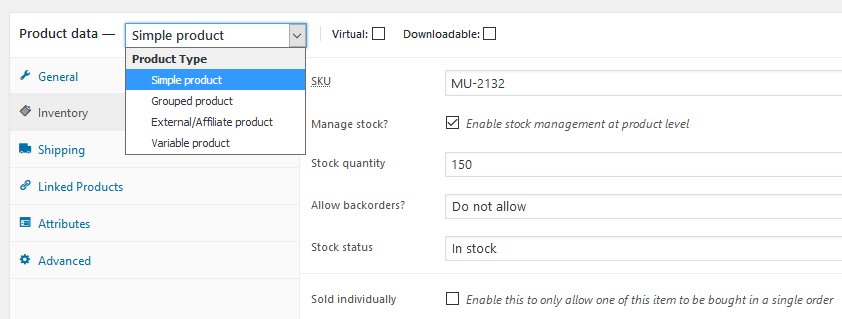
Image: WooCommerce – Products General
Inventory
The inventory section allows you to manage stock for the product individually and define whether to allow back orders and more. If stock management is disabled on the settings page, only the ‘Manage stock?’ option will be visible.
Shipping
In this section, you can specify the product weight and dimensions. If there is any shipping class for the product, you can choose that from the ‘Shipping type’ drop-down menu.
Linked Products
By adding up-sell and cross-sell products, this section lets you increase your conversion rate.
Up-sells are displayed on the product details page. These are products that you may wish to encourage users to upgrade, based on the product they are currently viewing. For example, if the user is viewing a basic coffee maker listing page, you may want to display the premium expresso maker on that same page as an up-sell.
Cross-sells are products that are displayed with the cart and related to the user’s cart contents. As an example, if the user adds a Nintendo DS to their cart, you may want to suggest they purchase a spare stylus when they arrive at the cart page.
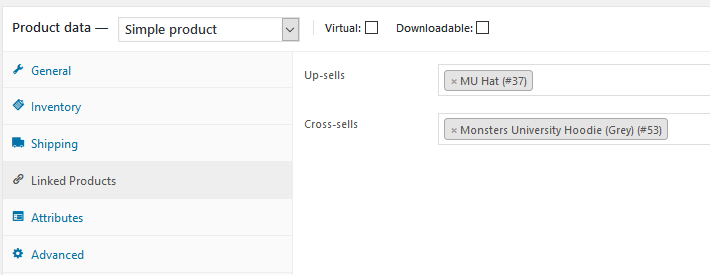
Image: WooCommerce – Linked Products
Attributes
Attributes provide additional information about the product. For instance, if you are selling a hoodie, you can include size, color, type, etc. as the attributes of the product.
To add a new attribute, click ‘Add’. Then, provide the attribute name and the value(s). You can choose to display the attributes on the product page by checking the ‘Visible on the product page‘ box.
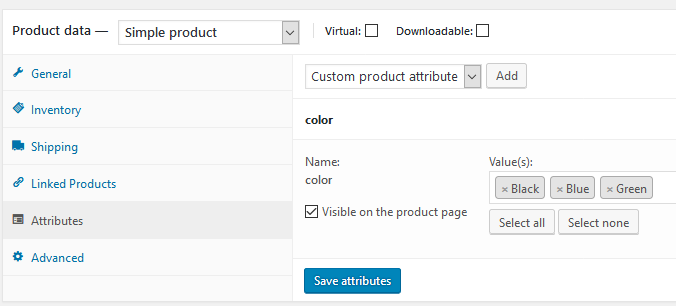
Image: WooCommerce – Product Attributes
Advanced
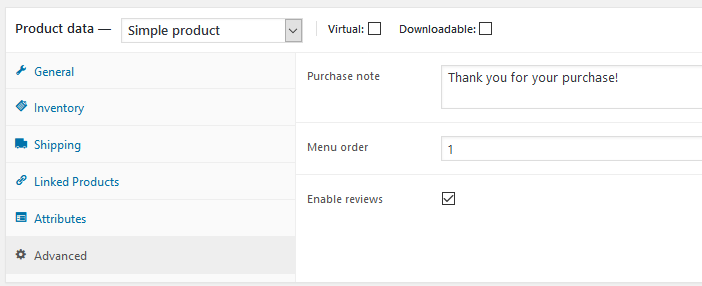
Image: WooCommerce – Advancd Settings
Categories and tags
On the right-hand side of the Product panel, there are product categories in which you can place your product, similar to a standard WordPress post. You can also assign product tags in the same way.
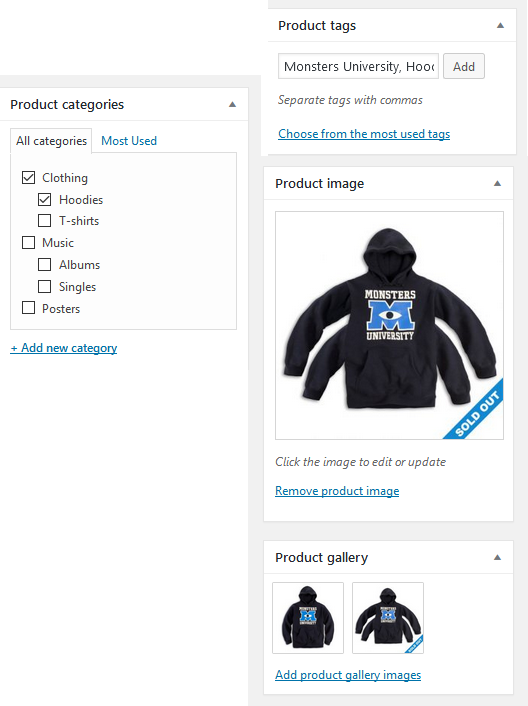
Image: WooCommerce – Categories and tags
Product Image
Add a product image as a featured image or create ‘Product Galleries’. This is good if a product has different colors, sizes, shapes or you want to provide different angled shots.
Note: Product image sizes could vary from theme to theme and will be given in the themes specific documentation.
After providing all the necessary information, click -> Publish.
Setting catalog visibility and feature status
On the Publish panel, you can set catalog visibility for your product.
Finally, you can view all the products in the Products -> Products page. For each product, there are several options – Edit, Trash, View, Duplicate.
Wrapping Up
Creating an e-commerce site is a time-consuming and continuous task, but I hope that this tutorial will help you better navigate your new WooCommerce store. If you have any questions about the setup or product-adding process, let me know in the comments below.
Finally, if you found this tutorial useful, feel free to share it with your friends.
Be well, do good, and stay Plesky!
The post HOW TO SET UP YOUR ONLINE STORE WITH WOOCOMMERCE appeared first on Plesk.
Continue reading...
WooCommerce is by far the most popular and rapidly developing plugin that provides e-commerce functionality for WordPress sites. Since its birth in 2011, it has become one of the most widely used tools to power online stores. After being acquired by Automattic, the company that brought us WordPress.com, you can rest assured you’re in good company.
If you haven’t used WooCommerce before, you should start with my first tutorial on how to install WordPress and WooCommerce plugins and themes, and how to keep them secure and up to date – with minimum effort.
This second tutorial for WooCommerce covers the various settings and options to successfully set up your online store!
Here’s what we’ll cover:
- General settings
- Define products settings
- Tax related options
- Shipping options for your online store
- Customize options related to checkout
- Account settings
- Customize various email options
- Enable the REST API
- Managing products
Before adding products to your e-commerce site, let’s set up your store first. To your store settings, go to WooCommerce -> Settings. The settings page is divided into several tabs, don’t forget to click the ‘Save Changes’ button after making changes.
General options
Here you will find the general settings for your online store.
Image: WooCommerce – General Settings
In this section, you can define your shop’s base country and state (i.e., Where you are based as a seller). It determines default tax rates and customer locations. Choose to sell to all countries or to specific countries, and which countries you will ship to. Do not forget to enable or disable taxes on your store. Unchecking ‘Enable taxes’ will hide the settings for taxes.
Plesk tip: You can also enable a site-wide notice from this section. To do that, check the ‘Store Notice’ box and enter the message in the box.
In this section, you can define all the currency-related options, including the default currency, currency position, thousand and decimal separator, the number of decimals, etc.
Define product settings
This tab lets you define the settings options for your products.
Image: WooCommerce – Product Settings
This section has two types of options. ‘Measurements’ lets you enter weight and dimensions units for products, and ‘Reviews’ lets you enable/disable ratings on product reviews.
Display
This section lets you define the shop page, what to display on that page, default product sorting and add-to-cart behavior. You can provide custom dimensions for catalog images, single product images, product thumbnails, and product images galleries.
Inventory
This section consists of the options related to inventory management
Plesk tip: Enable this feature by checking the ‘Enable stock management‘ box. Then, you can define when to send low stock and out of stock notifications to a particular recipient.
If you are offering digital products, this section controls how your store provides downloadable files to purchasers. It is also possible to require users to be logged in and to allow your product to be downloaded only after the order is processed.
Taxonomies
Image: WooCommerce – Taxonomies
Setting up taxes and tax rates is one of the first tasks you want to perform when setting up a store. Taxes can be a complex matter, but WooCommerce aims to make setup as straightforward as possible. More at: WooCommerce Tax Settings.
Plesk tip: We recommend consulting with a tax professional or an accountant on what may be your best options, plus any applicable laws to your state, country or business. Each business is unique, and there’s no way we can cover the millions of possibilities.
Image: WooCommerce – Shipping
The main shipping settings screen is for ‘Shipping Zones’. Think of a shipping zone as a geographic region where a certain set of shipping methods and their rates apply. WooCommerce will match a customer to a single zone using their shipping address and present the shipping methods within that zone to them.
Below, you will find available ‘Shipping methods’. Like payment gateways, you can rearrange them via drag & drop and choose a default method. You can customize the shipping method options from the top section.
Image: WooCommerce – Shipping Zones
‘Shipping classes’ can be used to group products of similar types and that use the same shipping methods, such as Flat Rate Shipping. For example, with shipping classes and Flat Rate Shipping, you can create different flat rates for different product types, like bulky items and small items.
Image: WooCommerce – Shipping Classes
Plesk tip: Shipping classes are used to group products – they are not used to offer shipping rates to customers. To set up shipping rates, configure Shipping Zones, and then add your shipping class costs to a shipping method, a Flat Rate for example.
Under the Checkout sub navigation section, there are several options for the general checkout process of your store.
Image: WooCommerce – Checkout options
If you want to provide coupons or allow guest checkout, you can do so by checking the respective boxes.
Plesk tip: When using a SSL certificate (strongly recommended) for your online shop, make sure HTTPS is being used on the checkout page by checking the ‘Force Secure Checkout’ page.
Pages need to be set so WooCommerce knows where to send users to check out: Cart Page, Checkout Page, or Terms and Conditions. You need not use a default WooCommerce page, but you must have a page set up for the Cart and Checkout pages. Otherwise, your customers cannot buy and pay.
Checkout endpoints
Endpoints are appended to page URLs to handle specific actions during the checkout process. They should be unique. Learn more about WooCommerce endpoints.
Payment Gateways
Installed gateways are listed and can be dragged and dropped to control the order in which they appear to customers.
Image: WooCommerce – Payment Gateways
Plesk tip: The free version comes with five payment gateways as listed below. You can add more by purchasing WooCommerce add-ons.
Free Payment Gateways included in WooCommerce:
- Cash on Delivery
- PayPal Standard
- Cheque
- BACS (Bank Transfer)
- Stripe
‘Pages’ need to be set so WooCommerce knows where to send users to access account-related functionality.
Image: WooCommerce – Account settings
My account page
Choose a page from the dropdown that you want to use for the ‘My Account page’.
My account endpoints
Endpoints are appended to your page URLs to handle specific actions on the accounts pages. They should be unique.
- Orders
- View Order
- Downloads
- Edit Account
- Addresses
- Payment Methods
- Lost Password
- Logout
In the ‘Enable Registration‘ section, you can allow the users to register on the checkout and my account pages. You can choose to auto-generate the username and password in the ‘Account Creation’ section.
Emails
From this section, you can customize various email options for your e-commerce site.
Email sender options
Set the ‘From’ name and email address for the sender used in WooCommerce emails.
Email template
This section lets you customize WooCommerce emails. You can provide a header image, add footer text and choose custom colors for the base, background, email body text, and background.
API settings
Choose to enable the ‘REST API’ to access store data from outside WordPress, e.g., our iOS app or other external apps.
Image: WooCommerce – REST API
Generate API Keys
The WooCommerce REST API works on a key system to control access. These keys are linked to WordPress users on your website. To create or manage keys for a specific WordPress user, go to Keys/Apps.
Image: WooCommerce – API Keys
To get started, select -> Add Key.
Image: WooCommerce – API Keys
Select the User you would like to generate a key for in the User field and add a Description. Choose the level of access for this API key, which can be Read access, Write access or Read/Write access. Then select the ‘Generate API Key’ button and WooCommerce will generate API keys for that user.
Now that keys have been generated, you should see two new keys, a QRCode, and a Revoke API Key button. These two keys are your Consumer Key and Consumer Secret.
Image: WooCommerce – Key Details
Place your consumer key and consumer secret in the application that uses the WooCommerce API (the application should request your URL as well).
Plesk tip: If you would like to learn more about REST API, check Gerhard’s (WooCommerce Engineer at Automattic) informative blog post, WooCommerce REST API Client Library.
You can find the REST API documentation at: WooCommerce REST API Docs.
Libraries
- Node.js
- Python
- PHP
- Ruby
Plesk tip: With Plesk you get a ready-to-code environment. Use PHP, JavaScript, Ruby, Python, Java, .Net, node.js, html5 and much more on the fly!
There are various kinds of products that you can add to your online store. In this section, you will learn the basics of adding a product and how to define the different types of products you add to your store.
You will also learn about adding descriptions and prices, as well as other options you may have while adding products to your store. Now, let’s see how to add products to your website.
First, let’s add products to your website.
Go to Products -> Add Product. You will be taken to a page like this.
Image: WooCommerce – Products
While the upper portion of the page looks almost like the new post editor, you will find product related options in the lower part. Provide the product name and a short product description. Then, move to the ‘Product Data‘ section below.
Product data – Type of products
First of all, choose the product type. The configurable options will vary depending on the product type:
- Simple Product – covers the vast majority of any products you may sell. Simple products are shipped and have no options. For example, a book.
- Grouped Product – a collection of related products that can be purchased individually and only consist of simple products. For example, a set of six drinking glasses.
- Virtual Product – one that doesn’t require shipping. For example, consulting or a service
- Downloadable Product – much like a virtual product, but customers are given a downloadable file. For example, digital album, PDF magazine, or photo.
- External/Affiliate Product – one that you list and describe on your website but is sold elsewhere.
- Variable Product – a product with variations, each of which may have a different SKU, price, stock option, etc. For example, a t-shirt available in different colors and/or sizes.
Note: Some extensions if installed will add more product date choices. For example, WooCommerce Subscriptions adds new product types as does WooCommerce Memberships.
In the first tab ‘General’, choose a regular price and the sale price of the product. If it is a downloadable product, you need to add the downloadable files and set the download limit and the download expiry date.
Image: WooCommerce – Products General
Inventory
The inventory section allows you to manage stock for the product individually and define whether to allow back orders and more. If stock management is disabled on the settings page, only the ‘Manage stock?’ option will be visible.
Shipping
In this section, you can specify the product weight and dimensions. If there is any shipping class for the product, you can choose that from the ‘Shipping type’ drop-down menu.
Linked Products
By adding up-sell and cross-sell products, this section lets you increase your conversion rate.
Up-sells are displayed on the product details page. These are products that you may wish to encourage users to upgrade, based on the product they are currently viewing. For example, if the user is viewing a basic coffee maker listing page, you may want to display the premium expresso maker on that same page as an up-sell.
Cross-sells are products that are displayed with the cart and related to the user’s cart contents. As an example, if the user adds a Nintendo DS to their cart, you may want to suggest they purchase a spare stylus when they arrive at the cart page.
Image: WooCommerce – Linked Products
Attributes
Attributes provide additional information about the product. For instance, if you are selling a hoodie, you can include size, color, type, etc. as the attributes of the product.
To add a new attribute, click ‘Add’. Then, provide the attribute name and the value(s). You can choose to display the attributes on the product page by checking the ‘Visible on the product page‘ box.
Image: WooCommerce – Product Attributes
Advanced
- Purchase note – Enter an optional note to send the customer after they purchase the product.
- Menu order – Custom ordering position for this item.
- Enable Reviews – Enable/Disable customers reviews for this item.
Image: WooCommerce – Advancd Settings
Categories and tags
On the right-hand side of the Product panel, there are product categories in which you can place your product, similar to a standard WordPress post. You can also assign product tags in the same way.
Image: WooCommerce – Categories and tags
Product Image
Add a product image as a featured image or create ‘Product Galleries’. This is good if a product has different colors, sizes, shapes or you want to provide different angled shots.
Note: Product image sizes could vary from theme to theme and will be given in the themes specific documentation.
After providing all the necessary information, click -> Publish.
Setting catalog visibility and feature status
On the Publish panel, you can set catalog visibility for your product.
- Catalog and search – Visible everywhere, shop pages, category pages and search results.
- Catalog – Visible in shop pages and category pages, but not search results.
- Search – Visible in search results, but not in the shop page or category pages.
- Hidden – Only visible on the single product page – not on any other pages.
Finally, you can view all the products in the Products -> Products page. For each product, there are several options – Edit, Trash, View, Duplicate.
Wrapping Up
Creating an e-commerce site is a time-consuming and continuous task, but I hope that this tutorial will help you better navigate your new WooCommerce store. If you have any questions about the setup or product-adding process, let me know in the comments below.
Finally, if you found this tutorial useful, feel free to share it with your friends.
Be well, do good, and stay Plesky!
The post HOW TO SET UP YOUR ONLINE STORE WITH WOOCOMMERCE appeared first on Plesk.
Continue reading...