• We value your experience with Plesk during 2024
    Plesk strives to perform even better in 2025. To help us improve further, please answer a few questions about your experience with Plesk Obsidian 2024.
    Please take this short survey:

    https://pt-research.typeform.com/to/AmZvSXkx
  • The Horde webmail has been deprecated. Its complete removal is scheduled for April 2025. For details and recommended actions, see the Feature and Deprecation Plan.

Issue Installing Rocket Chat in Plesk with Docker using tutorial, need an answer.

David Borrink

Basic Pleskian
Server operating system version
CentOS 7.9
Plesk version and microupdate number
Plesk Obsidian 18.0.59 #2
I'm trying to install Rocket Chat on Plesk using Docker, per this post: How to deploy Rocket.Chat in Plesk with docker – Markus' Blog instructions on how to do it. It's a five year old post, and I don't know if anything has changed since then. This is my first time trying to add something to my server using Docker.

This is the only post I've been able to find showing all the directions on how to install RocketChat on Plesk with Docker. I've been wanting to get this done for months, installing a chat system on my server for my family's use, and it's really been a challenge to find a clear set of instructions how to do this.

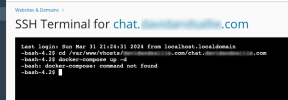
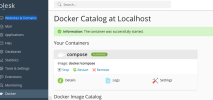
The problem is that I have cd'd to the directory location he references, created the docker-compose.yml file in it, and when I run the docker-compose up -d command, I get "docker-compose: command not found". I have Docker Compose active via a Docker Compose container I added through Docker, and it is active. His post had a downloading of the docker compose from GitHub, but since I already have docker compose added and active, I assume I didn't need to download and install it again by command line.

Could someone tell me if the installation method has changed since this post was written?
 

Attachments

  • Screenshot 2024-03-31 at 9.37.32 PM.png
    Screenshot 2024-03-31 at 9.37.32 PM.png
    35.8 KB · Views: 16
  • Screenshot 2024-03-31 at 9.37.19 PM.png
    Screenshot 2024-03-31 at 9.37.19 PM.png
    62.8 KB · Views: 14
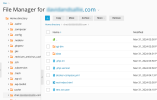
  • Screenshot 2024-03-31 at 9.45.13 PM.png
    Screenshot 2024-03-31 at 9.45.13 PM.png
    75.9 KB · Views: 15
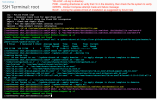
Hi Martin, hey thank you for taking the time to respond. I just tried what you suggested and it didn't work. I'm attaching a screen shot of my SSH session and I color-coded what I was doing so you can see what I did. I blurred out my domain names, FYI.

I also learned that I was trying this before in the SSH of the subdomain, and found the Root SSH in the Tools and Settings area. So this shows that I'm trying this at root level. There is a docker-compose.yml file in the directory I'm at. So why the "command not found" is not working, I could not say.

Screenshot 2024-04-06 at 2.01.08 PM.png
 
You have still not added docker-compose to the chroot template, you only added the program "ssh". You now made the program "ssh" available for the website in question. After adding the right programs to the chroot template you log in to Plesk, open the subscription and open a SSH terminal from that subscription page.

But before doing this you *first* have to install docker-compose per the instructions in the linked tutorial. It seems you did not do this yet, since you get a "command not found" as user root.

So first make sure docker-compose works as root. Only then you can continue to make it available for your chrooted SSH users.
Okay, that's where I'm confused because I went into my Docker panel on Plesk and loaded the Docker Compose container and activated it. See the middle screen shot on my initial post above. I have that running when I attempt. Is that Docker Compose not truly active even though I have it running as a container already?
 
Okay, that's where I'm confused because I went into my Docker panel on Plesk and loaded the Docker Compose container and activated it. See the middle screen shot on my initial post above. I have that running when I attempt. Is that Docker Compose not truly active even though I have it running as a container already?
seems that way, yes. Looks like you need to install something else server wide in order for your tutorial to work.
 
Okay, that's where I'm confused because I went into my Docker panel on Plesk and loaded the Docker Compose container and activated it. See the middle screen shot on my initial post above. I have that running when I attempt. Is that Docker Compose not truly active even though I have it running as a container already?
Docker Compose isn't supported by the Plesk docker extension. That's why the rocket.chat docker image cannot be used with the Plesk docker extension.

Docker Compose is different from Docker in that it can run multi-container applications. Which can be configured using a single YAML file. The Rocket Chat container contains both rocket.chat and mongodb, (= multi-container application) and therefor requires Docker Compose to run. That why the tutorial you linked to requires a lot of command line configuration.
Yes, I'm aware that Docker Compose is an "activator" that creates Docker setups, correct? That's why in the tutorial file I found (link in first post above), he says to create the directories, add a yaml file with the instructions for the rocket chat and mongodb containers, and then to run Docker Compose to activate and create everything. There were instructions on how to install Docker Compose by command line in his tutorial, but since Plesk has Docker built-in, I assumed I could just install the Docker-Compose container image and turn it on and it would work.

This has me confused about why Plesk has Docker built in and yet I need to install something by command and not using existing container images? Like I said, I'm new to Docker and pardon my ignorance, but isn't Docker like "plug-ins" in WordPress? You just install and add containers and turn them on? I was trying to install Mattermost before and found little to no clear instructions on how to do it for a newbie. I gave up and decided to try Rocket Chat instead because I found the above tutorial that was explaining in a more clear manner how to do it.
 
Yes, I'm aware that Docker Compose is an "activator" that creates Docker setups, correct?
Not really. The Docker Compose documentation page describes Docker Compose as "Docker Compose is a tool you can use to define and share multi-container applications. This means you can run a project with multiple containers using a single source." The key here is that with Docker Compose allows you the run multiple containers from a single source (ie image).

For the purpose of better understanding Docker, just think of Docker Compose as something different (but with the same technology).

That's why in the tutorial file I found (link in first post above), he says to create the directories, add a yaml file with the instructions for the rocket chat and mongodb containers, and then to run Docker Compose to activate and create everything. There were instructions on how to install Docker Compose by command line in his tutorial, but since Plesk has Docker built-in, I assumed I could just install the Docker-Compose container image and turn it on and it would work.
No no, I am afraid that's based on a false assumption. The Plesk Docker extension has no business in running the Rocket Chat image.

In fact, one of the last steps in the tutorial you've linked to is to run the command docker-compose up -d. That's all that's needed to start the Docker image. If everything goes well, that's pretty much the last step. (The other steps mentioned in the tutorial are basically a final check and a permission fix). No other Docker related steps should be necessary (not via command line nor via Plesk).

This has me confused about why Plesk has Docker built in and yet I need to install something by command and not using existing container images? Like I said, I'm new to Docker and pardon my ignorance, but isn't Docker like "plug-ins" in WordPress? You just install and add containers and turn them on?
I suppose. But like with WP plugins (most) docker containers need to be configurated to work properly. Which unlike most WP plugins can get quite technical.

I haven't tried the tutorial myself, but from the looks of it, it does a pretty solid jobs explaining al steps involved. From what I can gather from your posts in this thread you made a pretty decent attempt. But you seem to have missed the steps in the tutorial that explain how to install Docker Compose. I'd recommend picking it up from there (or start over all together).
 
Not really. The Docker Compose documentation page describes Docker Compose as "Docker Compose is a tool you can use to define and share multi-container applications. This means you can run a project with multiple containers using a single source." The key here is that with Docker Compose allows you the run multiple containers from a single source (ie image).

For the purpose of better understanding Docker, just think of Docker Compose as something different (but with the same technology).


No no, I am afraid that's based on a false assumption. The Plesk Docker extension has no business in running the Rocket Chat image.

In fact, one of the last steps in the tutorial you've linked to is to run the command docker-compose up -d. That's all that's needed to start the Docker image. If everything goes well, that's pretty much the last step. (The other steps mentioned in the tutorial are basically a final check and a permission fix). No other Docker related steps should be necessary (not via command line nor via Plesk).


I suppose. But like with WP plugins (most) docker containers need to be configurated to work properly. Which unlike most WP plugins can get quite technical.

I haven't tried the tutorial myself, but from the looks of it, it does a pretty solid jobs explaining al steps involved. From what I can gather from your posts in this thread you made a pretty decent attempt. But you seem to have missed the steps in the tutorial that explain how to install Docker Compose. I'd recommend picking it up from there (or start over all together).
Hi Kaspar, I'm back. I "started over", followed the instructions again to try this by installing the Docker Compose per the instructions on the tutorial. I had one issue where I went in with "nano /etc/hosts" to add my domain to the hosts file and I'm having a challenge understanding how to save in the terminal window. If I understand, it's ^O to writeout but when do command-O (I'm on a Mac) I get my browser's open dialog box. How am I supposed to save my edit to the hosts file here? There are the list of commands at the bottom of the terminal but there is no "Save" option. There is an Exit option ^X and I assume it's Command-X on Mac. I try Command X but it doesn't take me back to the Shell where I was.

So I trusted it was saved somehow and I reloaded the Terminal, cd'd to the directory again, went to the next step to run Docker Compose after verifying that all the proper directory and docker-compose.yml file were still there from before.

I ran the docker-compose up -d command and got this:

ERROR: client version 1.22 is too old. Minimum supported API version is 1.24, please upgrade your client to a newer version

Is this a Docker error or an error on my server? What would I need to do here? What version of what is this referring to?

I did go back to the "nano /etc/hosts" step and saw that my hosts file was not edited. So I've got two questions here. Client error, and how am I supposed to save an edited file in terminal if the commands are not working?
 
I just realized that I didn't check what the current version of docker is. I was going off a five year old tutorial and automatically copy-pasted his code. I'll have to check what the current version is and edit that part. Still need to figure out how to edit and save in terminal though.
 
Okay, this is baffling me. I tried to edit that hosts file in SSH on both Safari and on Chrome and neither setup is allowing me to use command-O to save or command-X to get back to the regular SSH window. I can run commands, no problem, but I cannot edit files or leave a file editor in SSH. I'm not finding any help on why this is a problem on MacOS.
 
I'll have to do a topic on why MacOS cannot run SSH file edit commands in a browser, because I was able to do it on my daughter's PC in Windows 10.
 
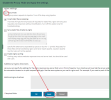
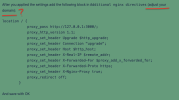
My next step after successfully completing all the steps was to go to the front page and do the setup wizard. But... I have a 502 Bad Gateway error. I went back and checked the instructions for configuring the Apache Nginx proxy mode and settings. They're correct except I notice there's an instruction to adjust my domain in the additional directives section. I'm not clear what spot that needs to be done to. I tried the first line with the 127.0.0.1 but that didn't do anything.
 

Attachments

  • Screenshot 2024-04-20 at 2.36.57 PM.png
    Screenshot 2024-04-20 at 2.36.57 PM.png
    57.5 KB · Views: 17
  • Screenshot 2024-04-20 at 2.41.06 PM.png
    Screenshot 2024-04-20 at 2.41.06 PM.png
    205.2 KB · Views: 17
  • Screenshot 2024-04-20 at 2.41.15 PM.png
    Screenshot 2024-04-20 at 2.41.15 PM.png
    71.5 KB · Views: 17
It is also possible to install Rocket.Chat without using docker-compose. We are using a setup of two single standard containers. One container is the needed MongoDB instance, e.g. Image: bitnami/mongodb:6.0.13. The other one is the Rocket.Chat server itself, e.g. Image: rocketchat/rocket.chat:6.6.6.
 
Of course, but I found that trying to install those Docker containers from the Docker repository on Plesk did not have any instructions on how to do so properly, or what to configure. The tutorial I found was the only one that had step-by-step instructions on what to do from within Plesk and it used Compose to do it. So that's why I used it. I have the containers up and running per a check in shell using Docker ps. They're up and running, but I need the proxy server instructions verified because that apparently is the last issue. Once that is settled, I should be able to use the setup wizard for Rocket Chat on the front end. I'm literally on the edge of completion in the installation.

If I remove the additional directions in the nginx panel. My site shows a 403 error. If I turn the proxy mode back on again, I get the standard Plesk "this site exists" screen. So getting the answer to my question above to what "adjust your domain" applies to would apparently solve the problem. The tutorial I found was five years old, and the author didn't leave any form of commenting or contacting.
 
@David Borrink Is 3000 your external docker mapped port of the container?

If the port is e.g. 3001 try the following config for "Additional nginx directives" (Proxy mode needs to be switched off too):

Code:
# see https://docs.rocket.chat/deploy/rocket.chat-environment-configuration/configuring-ssl-reverse-proxy
location ~ ^/.* {
    proxy_pass http://0.0.0.0:3001;
    proxy_set_header Host             $host;
    proxy_set_header X-Real-IP        $remote_addr;
    proxy_set_header X-Forwarded-For  $proxy_add_x_forwarded_for;

    proxy_set_header Upgrade $http_upgrade;
    proxy_set_header Connection "upgrade";
    proxy_set_header X-Forwarded-Proto http;
    proxy_set_header X-Nginx-Proxy true;
    proxy_http_version 1.1;

    proxy_redirect off;
}

If you still get an error please post the complete error message from the logfiles.
 
Back
Top