E
Enric Oon
Guest
Is your website experiencing heavy traffic? Are you looking for a solution that will reduce server load and will improve website speed? Varnish might just be what you need. Varnish listens for duplicate requests and provides a cached version of your website pages, mediating between your users’ requests and your server.
So how do you activate Varnish in Plesk Onyx? In this article, I will show you how you can easily increase your website speed by using Varnish as a one click Docker container running on Plesk. I will demonstrate how using a website caching solution like Varnish can easily improve both page response times and the maximum number of concurrent visitors on your website. To simulate real traffic and measure correct response times, I have used an external server similar to blitz.io, stormforger.com or loadstorm.com to generate lots of traffic and concurrent users to our site.
What is Varnish and why should you use it?

Varnish is a software that helps reduce the load on your server by caching the output of the request into the virtual memory. It is a so-called HTTP accelerator and is focused on HTTP only. Varnish is open source and is used by high traffic websites such as Wikipedia.
If you have lots of daily visitors, we recommend using a cache mechanism. You’ll see your response time improving significantly because the server can send the already cached data, directly from the memory, back to the client, without the resource consuming process handling on the web server. Additionally, it reduces the load on the CPU so that the server is able to handle many more requests without getting overloaded. I will demonstrate this in the stress tests later.
Running Varnish as a Docker container
Docker is a great open source project that makes it incredibly simple to add Varnish to a running server. We don’t need to install Varnish on the production server, we simply use a ready-to-go Varnish Docker image. The main advantage is that if something goes wrong with the container, we can simply remove it and spin-up a new container within seconds. The way in which Docker containers are designed guarantees that Varnish will always run independently of our system environment. Do you want to know more about Docker containers? Read more about the 6 essentials on Docker containers!
I will use the newly integrated Docker support in Plesk Onyx to activate Varnish. The Plesk interface makes it easy to get a Varnish instance running. We will still use terminal but only for small modifications of the Varnish configuration file. A further improvement would be to rebuild the Varnish Docker image so that it takes our configuration as parameter from the Plesk UI. For now, I’ll stick to the original Docker image and upload our configuration via shell.
Activate Varnish in Plesk Onyx and test on a static page
Okay, let’s try it first on the default static page of Plesk Onyx. In the default settings, Plesk uses Nginx as a reverse proxy server for Apache. This means that Nginx is listening to default port 80(443 for HTTPS) and Apache to an internal port (7080 HTTP, 7081 HTTPS). We will push our Varnish container in between of the two web servers. In this scenario, Varnish will get the request from Nginx and the content from Apache. Don’t worry, it’s easier than it sounds!
Go to Docker and search for the image “million12/varnish” in the Docker Image Catalog. Once found, click “run” and Plesk will download the image to your local machine. After the download, click “run (local)”, which will open the configuration page of the container. The only thing that we’ll change is the port mapping.
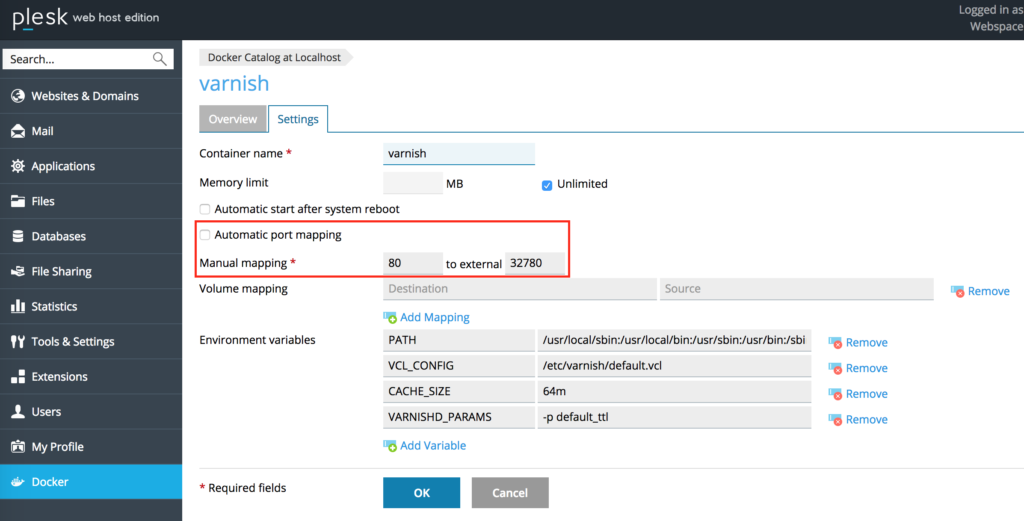
Varnish in Docker container on Plesk Onyx – Port mapping
Remove the tick at the option “Automatic port mapping” and set an external port (I will use port 32780 in this tutorial) for the option “Manual mapping”. This means that port 80 of the container is mapped to the external port 32780. By adding a proxy rule we can “talk” to the container through this external port. We will set the backend server in Varnish to the Apache port from where the data will be gathered if a “cache miss” occurred.
Test the Varnish functionality with a static page
Create a subdomain for testing our Varnish integration on a static page. After the subdomain was created, go to the “Hosting Settings” and deactivate the options “SSL/TLS support” and “Permanent SEO-safe 301 redirect from HTTP to HTTPS” because we want to test the Varnish functionality over HTTP first. Okay, but how do we redirect the requests to the Varnish container? This can be done easily with the option Docker Proxy Rules that you will find in the domain overview.
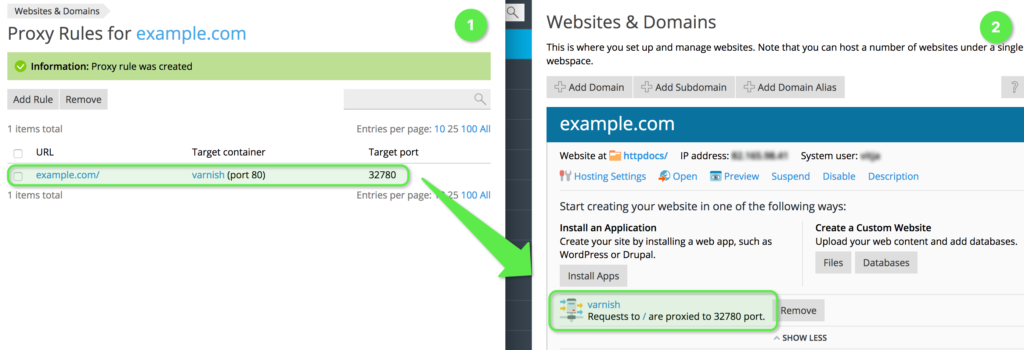
Varnish – Proxy rules for Docker container on Plesk Onyx
Click on “Add Rule” and select the previously created container and the port mapping that we entered manually. If you cannot make a selection, then your container is not running. In this case you should click on Docker in the menu and start the container first. If you open the subdomain after you’ve activated the proxy rule, you will see the error Error 503 Backend fetch failed. Don’t panic, this is an expected behavior. We did not configure the Varnish backend server yet!

Varnish – Error 503 Backend fetch failed
Configure Varnish properly in the Docker container using SSH
This is the only time when we need to access the server and the Varnish Docker container via SSH. Open your terminal and type
$ ssh [email protected] // Replace with your user name and correct IP address
Enter your password if required to get access to the server. Tip: use a private / public key pair to improve the security of your server!
First of all, we need to find out the ID of our Docker container. To list all active container type into the command line
$ docker ps

Varnish – Running Docker containers – Plesk Onyx
Copy the Docker ID and use the following command to access the Docker container
$ docker exec -it ID bash // Replace ID with the correct container ID
Okay, the most important thing to do is change the host and port value for the default backend server in the file /etc/varnish/default.vcl.
For .host we will enter the IP address of the server where Plesk is executed (in our example 111.222.333.444) and for .port 7080. As mentioned before, this is the default Apache HTTP port in Plesk. We have to use this port because, internally ,Varnish can only speak over an unencrypted channel!
Tip: Do we have a cache hit or miss?
How do we see that the content was loaded from the memory and not from the Apache server? You will see that the request was processed by Varnish through a special header entry in the response, you will not know whether the data was loaded from the memory or was requested from the Apache server.
To achieve it without having to use varnishlog in the console, we can set another header value with the corresponding value (cache hit / cache miss). We have to use the function sub vcl_deliver that is the last exit point for almost all code paths (except vcl_pipe). Add the following code within the curly brackets of the function sub vcl_deliver
if (obj.hits > 0) {
set resp.http.X-Cache = "HIT";
} else {
set resp.http.X-Cache = "MISS";
}
Use the Developer Tools in your browser to examine the response
Save the modified file and exit the container. Switch to your Plesk UI again and restart the container in Docker with the “Restart” button. When you see the success message, go to the tab of the subdomain with the 503 error message. Do not reload the page yet but open the Developer Tools first (alt + cmd + i on a MacBook). Go to the “Network” tab and reload the page. Select the first entry (URL /) and take a closer look at the “Response headers”.
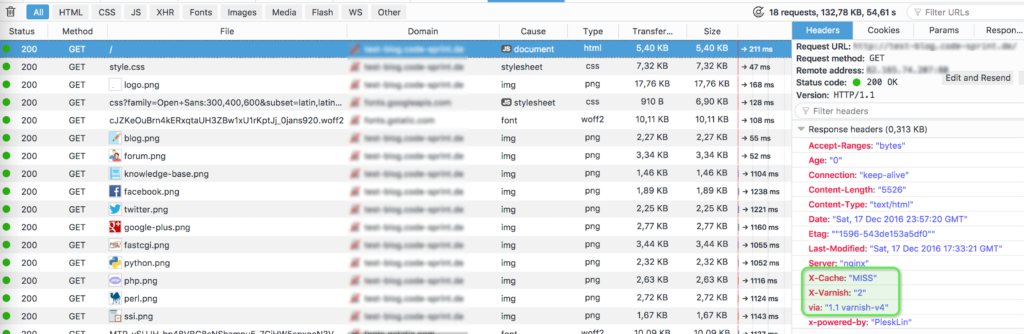
Varnish – Cache Miss
If everything was done properly, you will see some new header variables:
X-Cache – This is the variable that I’ve defined in the configuration file. After the first reload it should display a “MISS”.
X-Varnish: ID – The internal ID for this file in Varnish {more information required}
Via: "1.1 varnish-v4" – This shows that the request was redirected through the Varnish container.
Okay, it’s about time to see some Varnish magic! Click on the reload button in your browser to reload the page. This time it will be loaded from the virtual memory.
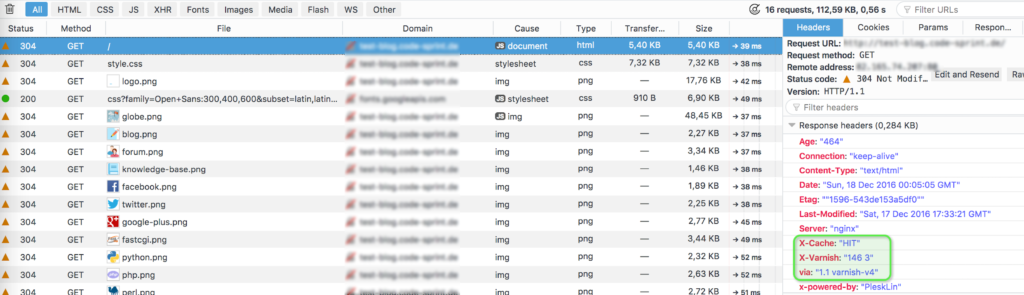
Varnish – Cache Hit
What about websites that are using HTTPS to encrypt the connection?
It also works and the best part of it is that you don’t have to change anything! Create an SSL certificate for the subdomain using the great Let’s encrypt extension. After the certificate was created and assigned (the extension does it automatically), go the the static page and reload it using https:// instead of http://. If you open your browser console, you will see a X-Cache: HIT in the response headers:
Activate Varnish caching in your WordPress website
We just saw that it’s technically possible to activate Varnish inside a Docker container with Plesk. Now let’s try it on a WordPress website!
The main difference is the configuration of the VLC configuration file within the Varnish container. WordPress is a dynamic CMS, thus we cannot cache everything without restricting the functionality of the system; the administration pages shouldn’t be cached since changes wouldn’t be possible any more for logged in users.
There are many pre-defined configuration files for WordPress available on the internet, from various developers. In most cases, you can use them right away without any modifications. For our test integration, we will take the configuration file created by HTPC Guides (with small adjustments – link below).
For this article and for the stress tests I’ve created a fully workable website with WordPress. I want to test under real conditions and not with a default WordPress installation. The website should also be secured with an SSL certificate and only callable over HTTPS. For this reason, I will also activate an SSL certificate with the help of the Let’s Encrypt extension for this installation.
Use a WordPress Plugin to activate support for HTTPS
Important: Do not use the option “Permanent SEO-safe 301 redirect from HTTP to HTTPS” within Plesk in “Hosting Settings” because this will lead to a redirect loop in our special environment constellation. Instead I will use a WordPress plugin to switch our installation completely to HTTPS. The name of the plugin is Really Simple SSL and can be downloaded from the official plugin repository.
Please make the same preparations like for the static page but add this time the additional required configuration data for WordPress to the default.vcl configuration file inside the Docker container. I’ve used the this Varnish configuration file (GitHub Gist) for my test installation. Don’t forget to adjust the backend server again like we already did for the static page!
Tip: Do not forget to restart the Docker container from the Plesk UI to reload the configuration information. If you forget to restart the container, then Varnish will not work properly with the WordPress website.
Now reload the front page of WordPress with the browser console open. The first loading process should throw an X-Cache: MISS but the second (and following) reloads will return an X-Cache: HIT.

Varnish in WordPress – Cache Hit
Let’s make some stress tests with Blitz.io!
We’ve seen that Varnish helps to improve the performance of the website. What is with the promised load reduction on the CPU? I can test it with the so-called stress testing which will load the website with many concurrent users per second for a certain time span. Without any security and overload protection, the server will start to respond steadily slower until the requests cannot be handled any more completely. With activated Varnish the server will be able to serve such intensive requests longer without throwing errors.
All right, it’s time to run load and performance tests with the external service provider Blitz.io.
Note: I used a very small server for this test instance (only 1 CPU and 500MB Memory), so the positive impact of Varnish should be much higher on a more powerful server!
Result WITHOUT Varnish:
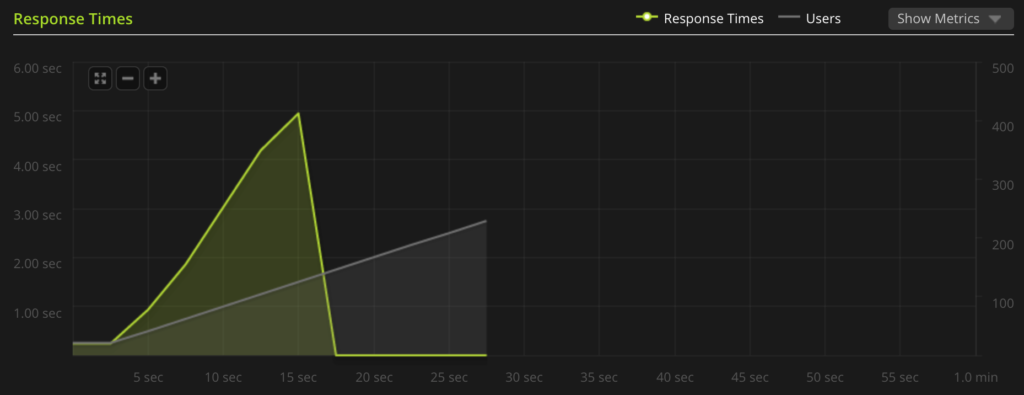
Stress test – WordPress without Varnish
As you can see, I had to abort the stress test because the server already couldn’t handle the request after less than 5 seconds and less than 50 concurrent users. After just 15 seconds the server collapsed completely and no requests could be managed any more!
Result WITH Varnish:
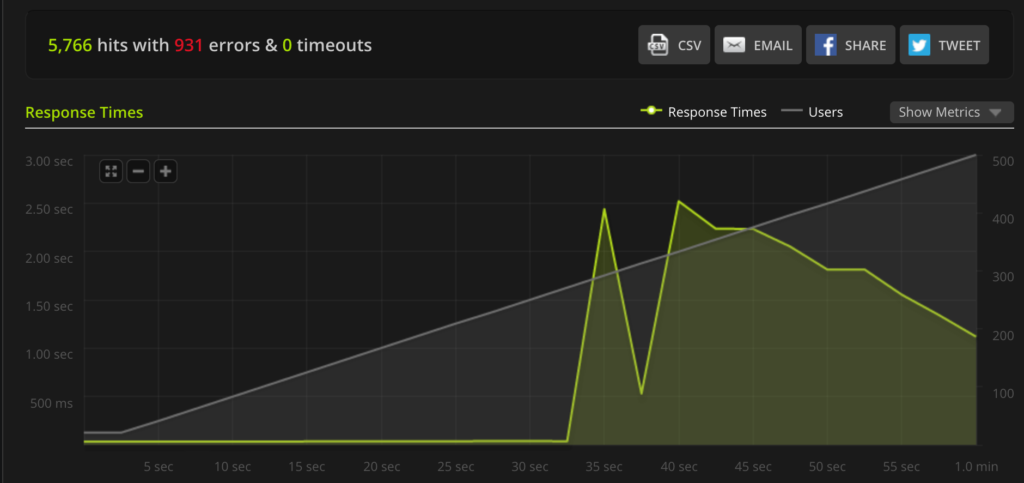
Stress test – WordPress with Varnish
Varnish magic! As you can see, the Varnish cache allows to keep the server stable even under heavy load. The small test server handled over 300 concurrent users and responded all requests over 30 seconds without any errors. After 30 seconds and over 300 concurrent users the server was overloaded and couldn’t accept further requests. With a more powerful server the numbers should be much higher! So, it’s also great to keep your website reactively if it suffers a DDoS attack, at least for a certain number of requests.
Summary: Varnish for WordPress within a Docker container in Plesk
Let me make a small checklist:
Mission accomplished!

As you’ve seen, Varnish can greatly improve the performance of your WordPress website and reduce the CPU-load of your server. It’s relatively easy to setup a working environment using Varnish in a Docker container between Nginx and Apache within Plesk. The most important part is the correct configuration of Varnish for your specific CMS.
Thank you for reading. In the next blog post I will take a look on another memory caching system (Memcached).
Stay tuned and Plesk!
The post Varnish for WordPress in a Docker container in Plesk Onyx appeared first on Plesk.
Continue reading...
So how do you activate Varnish in Plesk Onyx? In this article, I will show you how you can easily increase your website speed by using Varnish as a one click Docker container running on Plesk. I will demonstrate how using a website caching solution like Varnish can easily improve both page response times and the maximum number of concurrent visitors on your website. To simulate real traffic and measure correct response times, I have used an external server similar to blitz.io, stormforger.com or loadstorm.com to generate lots of traffic and concurrent users to our site.
What is Varnish and why should you use it?
Varnish is a software that helps reduce the load on your server by caching the output of the request into the virtual memory. It is a so-called HTTP accelerator and is focused on HTTP only. Varnish is open source and is used by high traffic websites such as Wikipedia.
If you have lots of daily visitors, we recommend using a cache mechanism. You’ll see your response time improving significantly because the server can send the already cached data, directly from the memory, back to the client, without the resource consuming process handling on the web server. Additionally, it reduces the load on the CPU so that the server is able to handle many more requests without getting overloaded. I will demonstrate this in the stress tests later.
Running Varnish as a Docker container
Docker is a great open source project that makes it incredibly simple to add Varnish to a running server. We don’t need to install Varnish on the production server, we simply use a ready-to-go Varnish Docker image. The main advantage is that if something goes wrong with the container, we can simply remove it and spin-up a new container within seconds. The way in which Docker containers are designed guarantees that Varnish will always run independently of our system environment. Do you want to know more about Docker containers? Read more about the 6 essentials on Docker containers!
I will use the newly integrated Docker support in Plesk Onyx to activate Varnish. The Plesk interface makes it easy to get a Varnish instance running. We will still use terminal but only for small modifications of the Varnish configuration file. A further improvement would be to rebuild the Varnish Docker image so that it takes our configuration as parameter from the Plesk UI. For now, I’ll stick to the original Docker image and upload our configuration via shell.
Activate Varnish in Plesk Onyx and test on a static page
Okay, let’s try it first on the default static page of Plesk Onyx. In the default settings, Plesk uses Nginx as a reverse proxy server for Apache. This means that Nginx is listening to default port 80(443 for HTTPS) and Apache to an internal port (7080 HTTP, 7081 HTTPS). We will push our Varnish container in between of the two web servers. In this scenario, Varnish will get the request from Nginx and the content from Apache. Don’t worry, it’s easier than it sounds!
Go to Docker and search for the image “million12/varnish” in the Docker Image Catalog. Once found, click “run” and Plesk will download the image to your local machine. After the download, click “run (local)”, which will open the configuration page of the container. The only thing that we’ll change is the port mapping.
Varnish in Docker container on Plesk Onyx – Port mapping
Remove the tick at the option “Automatic port mapping” and set an external port (I will use port 32780 in this tutorial) for the option “Manual mapping”. This means that port 80 of the container is mapped to the external port 32780. By adding a proxy rule we can “talk” to the container through this external port. We will set the backend server in Varnish to the Apache port from where the data will be gathered if a “cache miss” occurred.
Test the Varnish functionality with a static page
Create a subdomain for testing our Varnish integration on a static page. After the subdomain was created, go to the “Hosting Settings” and deactivate the options “SSL/TLS support” and “Permanent SEO-safe 301 redirect from HTTP to HTTPS” because we want to test the Varnish functionality over HTTP first. Okay, but how do we redirect the requests to the Varnish container? This can be done easily with the option Docker Proxy Rules that you will find in the domain overview.
Varnish – Proxy rules for Docker container on Plesk Onyx
Click on “Add Rule” and select the previously created container and the port mapping that we entered manually. If you cannot make a selection, then your container is not running. In this case you should click on Docker in the menu and start the container first. If you open the subdomain after you’ve activated the proxy rule, you will see the error Error 503 Backend fetch failed. Don’t panic, this is an expected behavior. We did not configure the Varnish backend server yet!
Varnish – Error 503 Backend fetch failed
Configure Varnish properly in the Docker container using SSH
This is the only time when we need to access the server and the Varnish Docker container via SSH. Open your terminal and type
$ ssh [email protected] // Replace with your user name and correct IP address
Enter your password if required to get access to the server. Tip: use a private / public key pair to improve the security of your server!
First of all, we need to find out the ID of our Docker container. To list all active container type into the command line
$ docker ps
Varnish – Running Docker containers – Plesk Onyx
Copy the Docker ID and use the following command to access the Docker container
$ docker exec -it ID bash // Replace ID with the correct container ID
Okay, the most important thing to do is change the host and port value for the default backend server in the file /etc/varnish/default.vcl.
For .host we will enter the IP address of the server where Plesk is executed (in our example 111.222.333.444) and for .port 7080. As mentioned before, this is the default Apache HTTP port in Plesk. We have to use this port because, internally ,Varnish can only speak over an unencrypted channel!
Tip: Do we have a cache hit or miss?
How do we see that the content was loaded from the memory and not from the Apache server? You will see that the request was processed by Varnish through a special header entry in the response, you will not know whether the data was loaded from the memory or was requested from the Apache server.
To achieve it without having to use varnishlog in the console, we can set another header value with the corresponding value (cache hit / cache miss). We have to use the function sub vcl_deliver that is the last exit point for almost all code paths (except vcl_pipe). Add the following code within the curly brackets of the function sub vcl_deliver
if (obj.hits > 0) {
set resp.http.X-Cache = "HIT";
} else {
set resp.http.X-Cache = "MISS";
}
Use the Developer Tools in your browser to examine the response
Save the modified file and exit the container. Switch to your Plesk UI again and restart the container in Docker with the “Restart” button. When you see the success message, go to the tab of the subdomain with the 503 error message. Do not reload the page yet but open the Developer Tools first (alt + cmd + i on a MacBook). Go to the “Network” tab and reload the page. Select the first entry (URL /) and take a closer look at the “Response headers”.
Varnish – Cache Miss
If everything was done properly, you will see some new header variables:
X-Cache – This is the variable that I’ve defined in the configuration file. After the first reload it should display a “MISS”.
X-Varnish: ID – The internal ID for this file in Varnish {more information required}
Via: "1.1 varnish-v4" – This shows that the request was redirected through the Varnish container.
Okay, it’s about time to see some Varnish magic! Click on the reload button in your browser to reload the page. This time it will be loaded from the virtual memory.
Varnish – Cache Hit
What about websites that are using HTTPS to encrypt the connection?
It also works and the best part of it is that you don’t have to change anything! Create an SSL certificate for the subdomain using the great Let’s encrypt extension. After the certificate was created and assigned (the extension does it automatically), go the the static page and reload it using https:// instead of http://. If you open your browser console, you will see a X-Cache: HIT in the response headers:
Activate Varnish caching in your WordPress website
We just saw that it’s technically possible to activate Varnish inside a Docker container with Plesk. Now let’s try it on a WordPress website!
The main difference is the configuration of the VLC configuration file within the Varnish container. WordPress is a dynamic CMS, thus we cannot cache everything without restricting the functionality of the system; the administration pages shouldn’t be cached since changes wouldn’t be possible any more for logged in users.
There are many pre-defined configuration files for WordPress available on the internet, from various developers. In most cases, you can use them right away without any modifications. For our test integration, we will take the configuration file created by HTPC Guides (with small adjustments – link below).
For this article and for the stress tests I’ve created a fully workable website with WordPress. I want to test under real conditions and not with a default WordPress installation. The website should also be secured with an SSL certificate and only callable over HTTPS. For this reason, I will also activate an SSL certificate with the help of the Let’s Encrypt extension for this installation.
Use a WordPress Plugin to activate support for HTTPS
Important: Do not use the option “Permanent SEO-safe 301 redirect from HTTP to HTTPS” within Plesk in “Hosting Settings” because this will lead to a redirect loop in our special environment constellation. Instead I will use a WordPress plugin to switch our installation completely to HTTPS. The name of the plugin is Really Simple SSL and can be downloaded from the official plugin repository.
Please make the same preparations like for the static page but add this time the additional required configuration data for WordPress to the default.vcl configuration file inside the Docker container. I’ve used the this Varnish configuration file (GitHub Gist) for my test installation. Don’t forget to adjust the backend server again like we already did for the static page!
Tip: Do not forget to restart the Docker container from the Plesk UI to reload the configuration information. If you forget to restart the container, then Varnish will not work properly with the WordPress website.
Now reload the front page of WordPress with the browser console open. The first loading process should throw an X-Cache: MISS but the second (and following) reloads will return an X-Cache: HIT.
Varnish in WordPress – Cache Hit
Let’s make some stress tests with Blitz.io!
We’ve seen that Varnish helps to improve the performance of the website. What is with the promised load reduction on the CPU? I can test it with the so-called stress testing which will load the website with many concurrent users per second for a certain time span. Without any security and overload protection, the server will start to respond steadily slower until the requests cannot be handled any more completely. With activated Varnish the server will be able to serve such intensive requests longer without throwing errors.
All right, it’s time to run load and performance tests with the external service provider Blitz.io.
Note: I used a very small server for this test instance (only 1 CPU and 500MB Memory), so the positive impact of Varnish should be much higher on a more powerful server!
Result WITHOUT Varnish:
Stress test – WordPress without Varnish
As you can see, I had to abort the stress test because the server already couldn’t handle the request after less than 5 seconds and less than 50 concurrent users. After just 15 seconds the server collapsed completely and no requests could be managed any more!
Result WITH Varnish:
Stress test – WordPress with Varnish
Varnish magic! As you can see, the Varnish cache allows to keep the server stable even under heavy load. The small test server handled over 300 concurrent users and responded all requests over 30 seconds without any errors. After 30 seconds and over 300 concurrent users the server was overloaded and couldn’t accept further requests. With a more powerful server the numbers should be much higher! So, it’s also great to keep your website reactively if it suffers a DDoS attack, at least for a certain number of requests.
Summary: Varnish for WordPress within a Docker container in Plesk
Let me make a small checklist:
- Varnish in Docker container? Yes.
- Varnish in WordPress? Yes.
- Varnish in Plesk? Yes.
- Varnish for WordPress within Docker container in Plesk? Hell, yes!
Mission accomplished!
As you’ve seen, Varnish can greatly improve the performance of your WordPress website and reduce the CPU-load of your server. It’s relatively easy to setup a working environment using Varnish in a Docker container between Nginx and Apache within Plesk. The most important part is the correct configuration of Varnish for your specific CMS.
Thank you for reading. In the next blog post I will take a look on another memory caching system (Memcached).
Stay tuned and Plesk!
The post Varnish for WordPress in a Docker container in Plesk Onyx appeared first on Plesk.
Continue reading...
")