I
Ivan Butorin
Guest
At Plesk, we believe in pairing exceptional technology with the knowledge to use these tools. That is why we have made all courses and certificates from Plesk University free for everyone.
All our online courses are built with real-life scenarios, best practices, and use cases in mind, and allows you to learn at your own pace at home, in the office, or on the go. Whichever course you pick, you can expect a hands-on experience in a safe learning environment through engaging activities and lab exercises.
After completing a course, you can challenge yourself by sitting for an exam to earn yourself a Plesk University certificate, which will prove your expertise to your employers and colleagues, as well as boost your chances of landing a new job or a well-deserved pay raise.
Here’s how to get started:
Step 1: Register at Plesk University
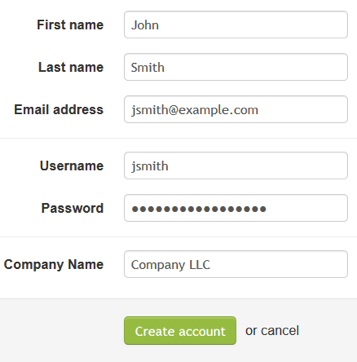
Go to Plesk University and create a new account using your e-mail address. You’ll need to confirm your registration by clicking a link sent to your email inbox.
Step 2: Pick a learning path
Plesk University grades its courses and certification exams to three levels of proficiency that address different target audience groups and educational needs:
– Marketing & Sales Professionals
If you are a marketing professional or a sales representative, and want to know how to package and sell solutions, then the Solutions for Service Providers course is for you. You’ll learn how to use Plesk Onyx and its extensions to build specialized service offers so you can switch from selling infrastructure to selling solutions.
– Server Administrators & Hosters
If you want to start using Plesk Onyx on your server or deploy it for your customers, the Plesk Onyx Professional Course is what you’ll need. It gets you started on the path to becoming a Plesk Onyx administrator and guides you through installation, initial set up, provisioning hosting services, and performing basic administrative tasks.
– Server Administrators & Technical Engineers
But if you want to learn absolutely everything there is to know about upgrading, migrating, and troubleshooting Plesk Onyx, then the Expert courses (for Linux and Windows) are for you. Built for Plesk administrators and Technical Support Engineers, these courses are rooted in real-life scenarios, and will fashion you into a self-reliant and confident Plesk Expert.
Although you can choose to do the courses in any order, we’d recommend that you complete the Plesk Onyx Professional Course before attempting the Expert courses.
Step 3: Complete the course
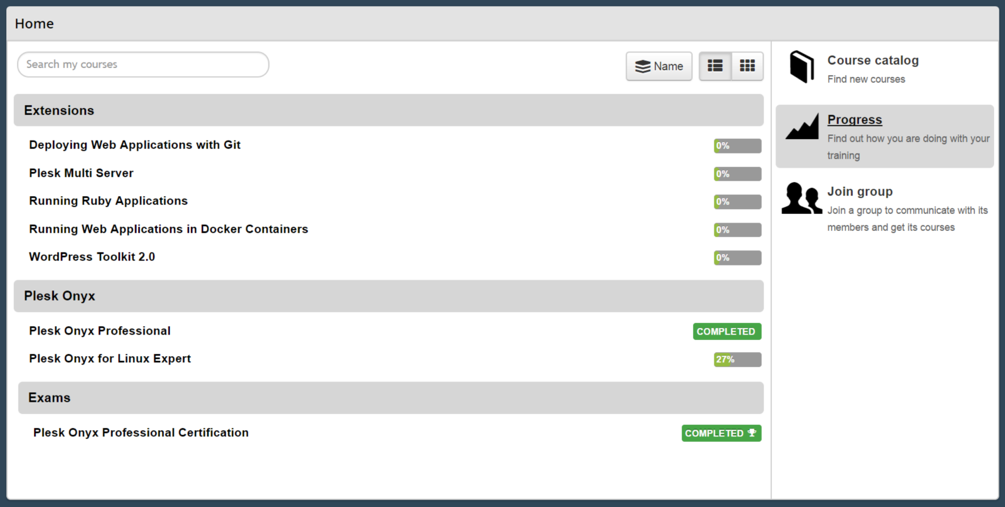
Once you’ve decided which course to enroll for, head over to the course catalog to get started.
All Plesk University courses are self-paced, and split into easily digestible sessions, each about 10 to 20 minutes long. If you wish to, you can pause and resume at any point.

Expert-level courses will include additional instructions and scripts for lab exercises, which you can complete in your own lab environment to practice troubleshooting tasks.
Step 4: Schedule an exam
Once you complete the course, you’ll be automatically assigned a certification exam. There’s no requirement to complete the exam immediately, so you can take your time to review and complete practical tasks.
All exams are conducted with a remote proctor, who will verify your credentials and monitor your activity during the exam with a web camera, microphone, and remote-access software. This procedure guarantees that all Plesk certificates are only granted when fully earned.
Schedule a free exam appointment at least 72 hours in advance, or pay a small fee for priority scheduling if you just cannot wait to get that sweet certificate. Instructions on how to schedule an exam appointment are available in the introduction to each certification course.
Step 5: Pass the exam
When the time of your appointment comes, start the exam as instructed in the introduction to the certification course.
The proctor will verify your identity, secure your environment (by observing your workplace and closing all programs not allowed during the exam), and unlock the exam with a password.
The exam takes 30 to 45 minutes to complete and contains 20 to 30 multiple-choice scenario-based questions (depending on the level). To pass the exam, you must answer at least 80% of questions correctly.
If you failed on your first try, you’ll have to wait seven days for another chance to pass the exam. Spend this time revising course materials since there won’t be a third attempt.
Final step: Share your success
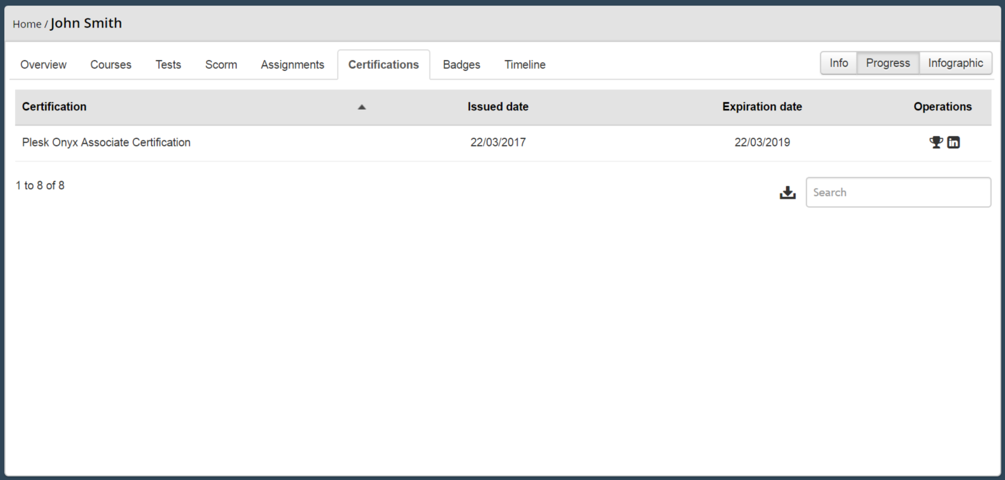
Once you’ve passed the exam, a certificate will be issued to you automatically. You will be able to download and print it as a PDF:
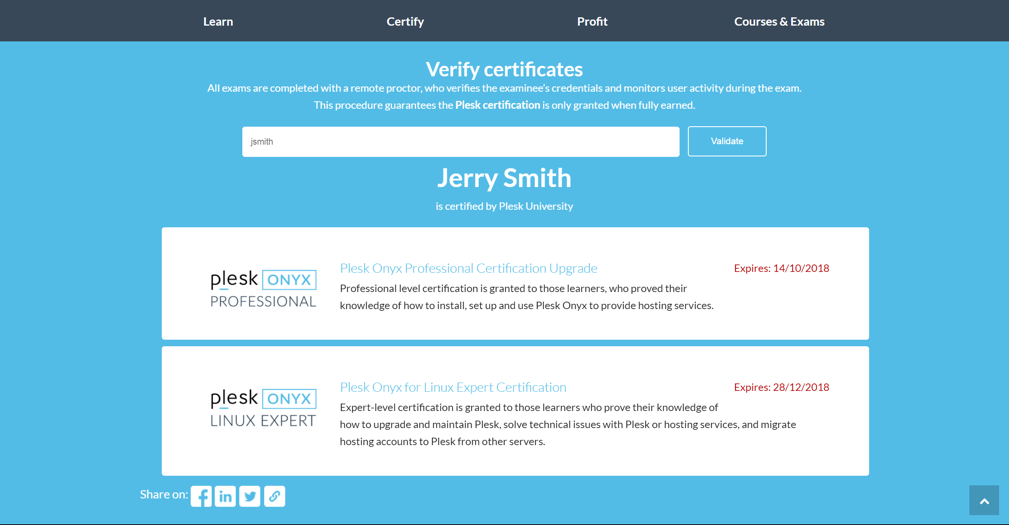
You can also share a link to your Plesk University transcript:
Questions? Check our FAQ or send us a message at [email protected]. In the meantime, class dismissed!
The post 5 easy steps to become certified by Plesk appeared first on Plesk.
Continue reading...
All our online courses are built with real-life scenarios, best practices, and use cases in mind, and allows you to learn at your own pace at home, in the office, or on the go. Whichever course you pick, you can expect a hands-on experience in a safe learning environment through engaging activities and lab exercises.
After completing a course, you can challenge yourself by sitting for an exam to earn yourself a Plesk University certificate, which will prove your expertise to your employers and colleagues, as well as boost your chances of landing a new job or a well-deserved pay raise.
Here’s how to get started:
Step 1: Register at Plesk University
Go to Plesk University and create a new account using your e-mail address. You’ll need to confirm your registration by clicking a link sent to your email inbox.
Step 2: Pick a learning path
Plesk University grades its courses and certification exams to three levels of proficiency that address different target audience groups and educational needs:
– Marketing & Sales Professionals
If you are a marketing professional or a sales representative, and want to know how to package and sell solutions, then the Solutions for Service Providers course is for you. You’ll learn how to use Plesk Onyx and its extensions to build specialized service offers so you can switch from selling infrastructure to selling solutions.
– Server Administrators & Hosters
If you want to start using Plesk Onyx on your server or deploy it for your customers, the Plesk Onyx Professional Course is what you’ll need. It gets you started on the path to becoming a Plesk Onyx administrator and guides you through installation, initial set up, provisioning hosting services, and performing basic administrative tasks.
– Server Administrators & Technical Engineers
But if you want to learn absolutely everything there is to know about upgrading, migrating, and troubleshooting Plesk Onyx, then the Expert courses (for Linux and Windows) are for you. Built for Plesk administrators and Technical Support Engineers, these courses are rooted in real-life scenarios, and will fashion you into a self-reliant and confident Plesk Expert.
Although you can choose to do the courses in any order, we’d recommend that you complete the Plesk Onyx Professional Course before attempting the Expert courses.
Step 3: Complete the course
Once you’ve decided which course to enroll for, head over to the course catalog to get started.
All Plesk University courses are self-paced, and split into easily digestible sessions, each about 10 to 20 minutes long. If you wish to, you can pause and resume at any point.
Expert-level courses will include additional instructions and scripts for lab exercises, which you can complete in your own lab environment to practice troubleshooting tasks.
Step 4: Schedule an exam
Once you complete the course, you’ll be automatically assigned a certification exam. There’s no requirement to complete the exam immediately, so you can take your time to review and complete practical tasks.
All exams are conducted with a remote proctor, who will verify your credentials and monitor your activity during the exam with a web camera, microphone, and remote-access software. This procedure guarantees that all Plesk certificates are only granted when fully earned.
Schedule a free exam appointment at least 72 hours in advance, or pay a small fee for priority scheduling if you just cannot wait to get that sweet certificate. Instructions on how to schedule an exam appointment are available in the introduction to each certification course.
Step 5: Pass the exam
When the time of your appointment comes, start the exam as instructed in the introduction to the certification course.
The proctor will verify your identity, secure your environment (by observing your workplace and closing all programs not allowed during the exam), and unlock the exam with a password.
The exam takes 30 to 45 minutes to complete and contains 20 to 30 multiple-choice scenario-based questions (depending on the level). To pass the exam, you must answer at least 80% of questions correctly.
If you failed on your first try, you’ll have to wait seven days for another chance to pass the exam. Spend this time revising course materials since there won’t be a third attempt.
Final step: Share your success
Once you’ve passed the exam, a certificate will be issued to you automatically. You will be able to download and print it as a PDF:
You can also share a link to your Plesk University transcript:
Questions? Check our FAQ or send us a message at [email protected]. In the meantime, class dismissed!
The post 5 easy steps to become certified by Plesk appeared first on Plesk.
Continue reading...